Introduction
In a working environment where multiple users need to access shared data — such as a technical team, accounting department, or IT office — using Samba is a popular and convenient way to share files within a local network.
Let’s consider the following scenario:
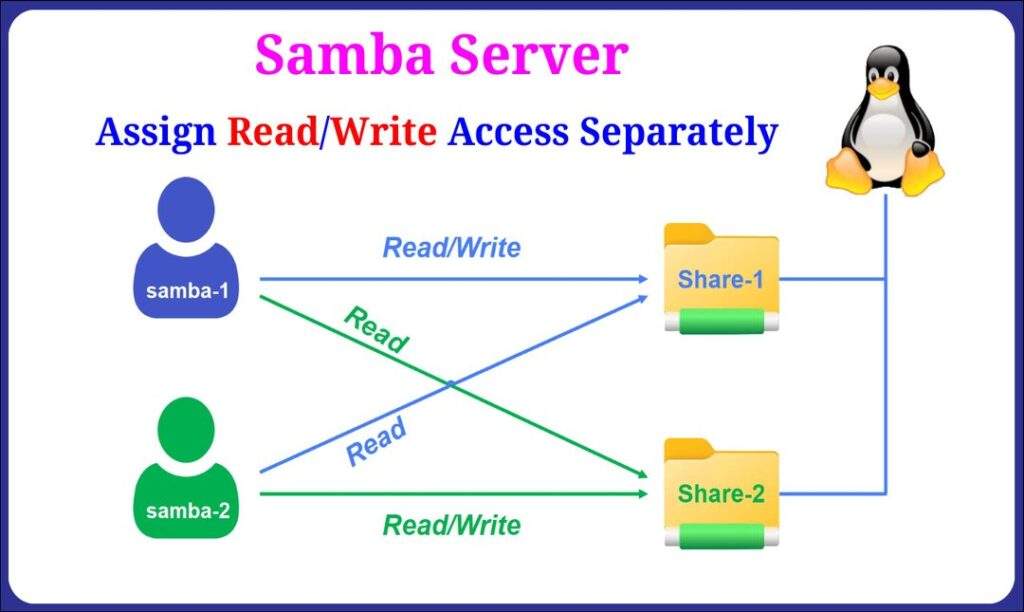
- On an Samba server, you want to set up two shared folders: Share-1 and Share-2.
- There are two users, samba-1 and samba-2, working together.
- samba-1 should have read, write, and delete permissions on Share-1, and read-only access to Share-2.
- samba-2 should have read, write, and delete permissions on Share-2, and read-only access to Share-1.
To make management easier, we’ll create a dedicated group named grp-samba, add both users to this group, and configure Samba so that only members of this group can access the shared folders.
Read more
- Samba – Part 1 – Install Samba Server on Linux Ubuntu | Debian
- Samba – Part 2 – Share a Folder with Read and Write Access in LAN
Create a dedicated Samba group
First, create a group to manage access permissions:
sudo groupadd grp-samba
This group will act as a container for all users who are allowed to access Samba shares.
Create users, set passwords, and add them to the group
Now create two system users — these accounts will be used exclusively for Samba access (they won’t have shell login permissions):
sudo adduser --no-create-home --disabled-login samba-1
sudo adduser --no-create-home --disabled-login samba-2
Then, set Samba passwords for each user (Samba uses its own authentication system):
sudo smbpasswd -a samba-1
sudo smbpasswd -a samba-2
Finally, add both users to the grp-samba group:
sudo usermod -aG grp-samba samba-1
sudo usermod -aG grp-samba samba-2
Create shared directories
Create two shared folders corresponding to each user’s area:
sudo mkdir -p /Samba/Share-1
sudo mkdir -p /Samba/Share-2
Set ownership:
sudo chown -R samba-1:grp-samba /Samba/Share-1
sudo chown -R samba-2:grp-samba /Samba/Share-2
Set permissions so both the owner and group can read/write, while others have no access:
sudo chmod -R 2775 /Samba/Share-1
sudo chmod -R 2775 /Samba/Share-2
The 2 in 2775 ensures that any subfolders inherit the same group (grp-samba).
Configure Samba shares
Open the Samba configuration file:
sudo nano /etc/samba/smb.conf
Add the following sections at the end of the file:
[Share-1]
   path = /Samba/Share-1
   browseable = yes
   read only = no
   writable = yes
   valid users = @grp-samba
   write list = samba-1
   create mask = 0664
   directory mask = 0775
   force group = grp-samba

[Share-2]
   path = /Samba/Share-2
   browseable = yes
   read only = no
   writable = yes
   valid users = @grp-samba
   write list = samba-2
   create mask = 0664
   directory mask = 0775
   force group = grp-samba
Explanation:
valid users = @grp-samba: only users in this group can access the share.write list: specifies which user can write/delete files in that share.force group: ensures all files created belong to grp-samba.create maskanddirectory mask: define default permissions for new files/folders.
Restart Samba service
Apply changes and restart the service:
sudo systemctl restart smbd
Check service status:
sudo systemctl status smbd
If it shows active (running), the configuration is working correctly.
Test from a client machine
From a Windows or Linux client in the same network, open the Run dialog or file manager and access:
\\server-ip\Share-1
or
\\server-ip\Share-2
When prompted, enter:
- samba-1 → full access to Share-1, read-only access to Share-2.
- samba-2 → full access to Share-2, read-only access to Share-1.
Conclusion
With this setup:
- You’ve created a dedicated group (grp-samba) to manage all Samba users.
- Each user has individual write permissions to their own folder while being able to read from the other’s.
- The configuration is easy to extend — just add new users to the group without editing the Samba config file.
In the next tutorial, we’ll go one step further and configure individual private folders for each user to improve privacy and access control in multi-user environments.