In this article, we will explore what an NTP server is and How to Install and Configure an NTP server on Ubuntu
What is NTP?
NTP (Network Time Protocol) is a network protocol designed to synchronize time across devices in a computer network or over the internet. NTP helps synchronize time among computers and devices in a network, ensuring that they display accurate and consistent time.
An NTP server is a device or software running the NTP protocol, providing accurate time to other devices in the network. NTP servers typically connect to a reliable time source, such as atomic clocks or authoritative time servers, to provide accurate time to other devices in the network.
The applications of NTP and NTP servers include:
- Time Synchronization: NTP helps synchronize time among computers and devices in a network, crucial for various applications, including logging, data synchronization, and determining the timing of events within the network.
- Security: In some cases, NTP is used to enhance network security by ensuring that events and transactions in the network are timestamped accurately.
- Information Technology Applications: In server systems, especially cloud servers and distributed systems, synchronizing time through NTP is essential to maintain consistency and accuracy of data and transactions.
- System Time Adjustment: NTP is also used to adjust the system time on computers and devices, helping them maintain high accuracy in displaying time.
NTP uses a client-server model, where devices in the network are configured to query NTP servers to obtain accurate time. If you need to deploy a network or server system that requires accurate time, setting up and configuring an NTP server is a crucial process.
Prerequisites
- Operating system: An Ubuntu Server ( Ubuntu Desktop or Ubuntu Server)
- User privileges: root or non-root user with sudo privileges
- Recommended: The server has been configured with a static IP address
Read more: How to Configure Static IP Address on Ubuntu Server or How to Set Up a Static IP Address on Ubuntu Desktop
Step-by-step Install and Configure NTP Server on Ubuntu
Step 1 – Update system
Before you begin, ensure that your system is updated with the latest versions of applications and software packages. To do this, run the following command:
sudo apt update
Step 2 – Install NTP Server on Ubuntu
Install the NTP package on your Ubuntu system using the following command:
sudo apt install ntp -y
This command will download and install the NTP software on your system.
Start the NTP service and enable it to run on system boot with the following commands:
sudo systemctl start ntp
sudo systemctl enable ntp
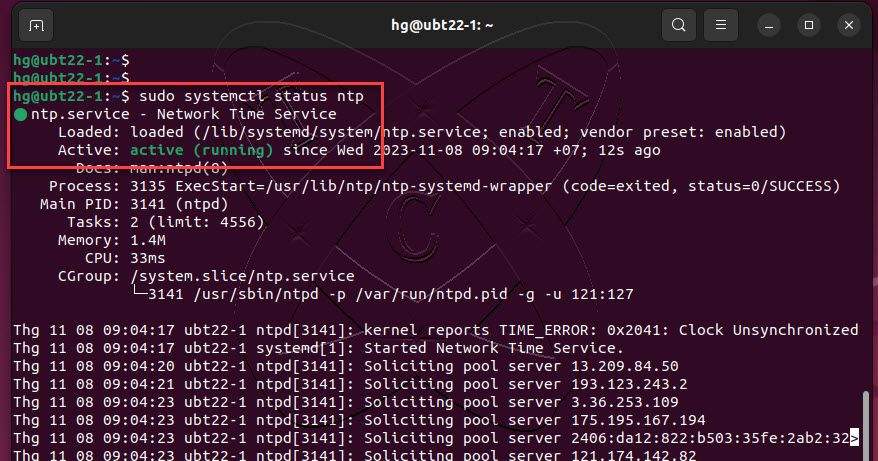
To ensure everything is working correctly, check the status of the NTP service:
sudo systemctl status ntp
If the service is active and running without any errors, the status of the NTP server will be shown as running as below:
Step 3 – Configure NTP Server
After successfully setting up the NTP server, it will automatically use the system’s time zone as the default. However, suppose you want to configure your NTP server to be closer to your specific location or adhere to a particular time zone. In that case, you need to edit the NTP configuration file. To do this, you can open the NTP configuration file using the following command:
sudo vim /etc/ntp.conf
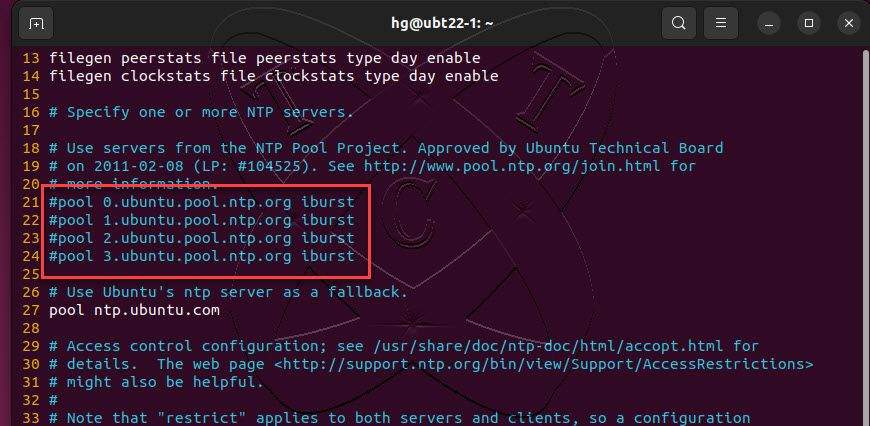
In this configuration file, the system by default has specified a number of time servers as shown in the diagram below:
HA
To change the time servers to the time zone you specify, you need to comment out the default server pool as shown below:
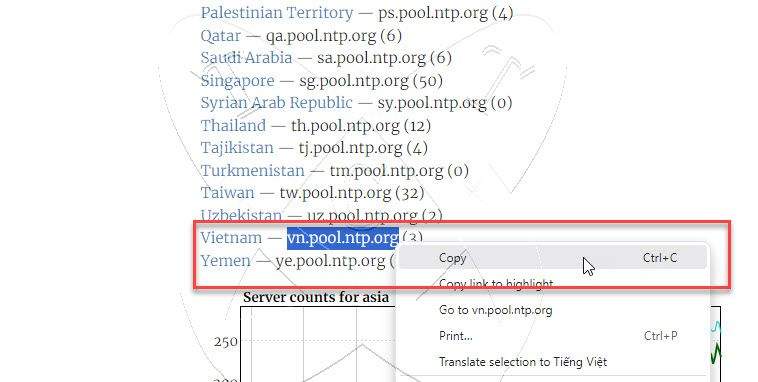
To choose a pool list according to your location, visit the following page: NTP Pool Time Servers. After that, select the Region and then choose the Country where you want to set the time zone.
As in the example below, I selected the Asia region and chose Vietnam as the country:
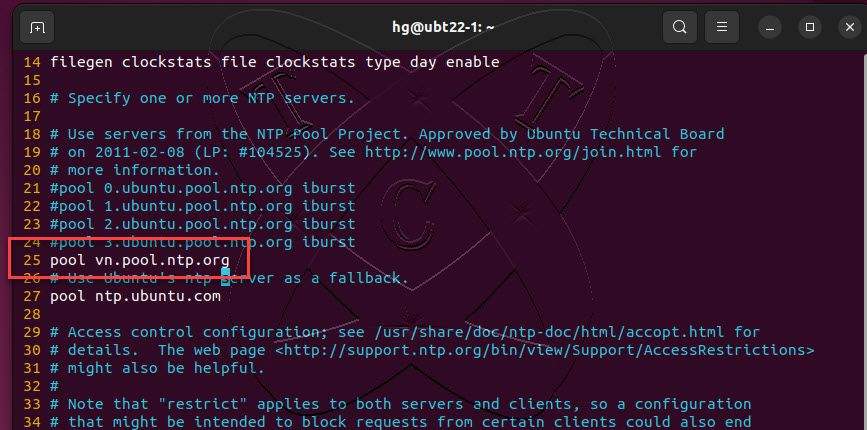
Next, obtain the time zone information and add it to the configuration file as follows:
Once finished, save and exit the file.
Restart the NTP service to apply the changes.
sudo systemctl restart ntp
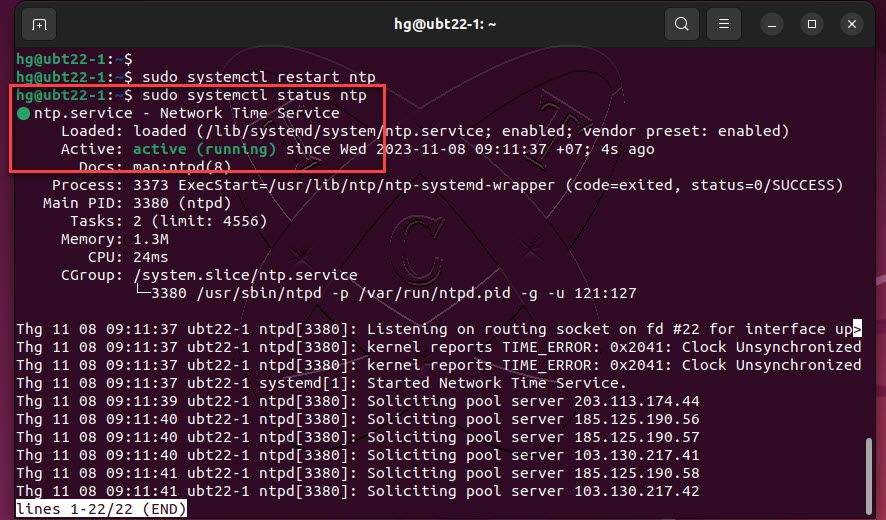
And ensure that the NTP service is still running on the system:
sudo systemctl status ntp
Conclusion
Through this article, you can set up an NTP server according to your preferences. To synchronize time across your clients, refer to the following articles:
- How to synchronize time with an NTP server on Ubuntu: ✍️ updating
- How to synchronize time with an NTP server on CentOS-based: ✍️ updating
- How to synchronize time with an NTP server on Windows: ✍️ updating
I hope this helps! If you need further assistance or have any questions, feel free to reach out. I wish you success in managing your system, and have a great day!
Read more
- How to Install and Configure NTP Server on Windows Server
- How to Install and Configure NTP Client on Windows: ✍️updating
- How to Install and Configure NTP Client on Ubuntu: ✍️ updating
- How to Install and Configure NTP Client on CentOS-based: ✍️ updating