Hello everyone, in this article, we will explore together How to Install and Configure an NTP Server on Windows Server 2012/2016/2019/2022
What is an NTP Server?
NTP (Network Time Protocol) is a network protocol used to synchronize time across computers and devices in a network. NTP ensures that devices in the network operate with the same standard time, which is crucial in various applications, especially in server systems and large networks.
An NTP server is a computer configured to provide accurate time according to the NTP standard for other devices in the network. NTP servers often connect to precise time sources such as atomic clocks or official time servers on the Internet.
Features
Some important features of NTP servers include:
- Accurate Time Synchronization: NTP servers accurately synchronize the time across the network with the standard time.
- Time Dispersion Control: NTP has the ability to adjust time synchronization with low dispersion, helping to reduce latency in data transmission.
- Flexibility: NTP supports multiple levels of time synchronization, from large systems to individual devices.
- Security: New versions of NTP provide security measures to prevent tampering with time information.
NTP servers are commonly deployed in large networks, server systems, and environments where time accuracy is critical. Using NTP helps synchronize time across the network, reducing the likelihood of conflicts and errors due to inconsistencies in system time.
Step-by-step Install and Configure NTP Server on Windows Server
Step 1 – Enable NTP Server
To activate the NTP Server on Windows Server, follow these steps:
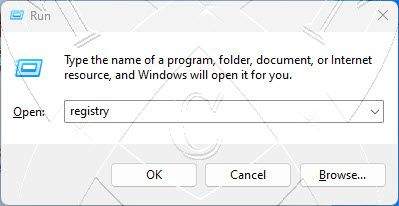
Open the Run window by pressing the Windows key + R simultaneously. In the Run dialog, type regedit and press Enter.
The Registry Editor window is open, navigate to the following path:
HKEY_LOCAL_MACHINE\SYSTEM\CurrentControlSet\Services\W32Time\TimeProviders\NtpServer
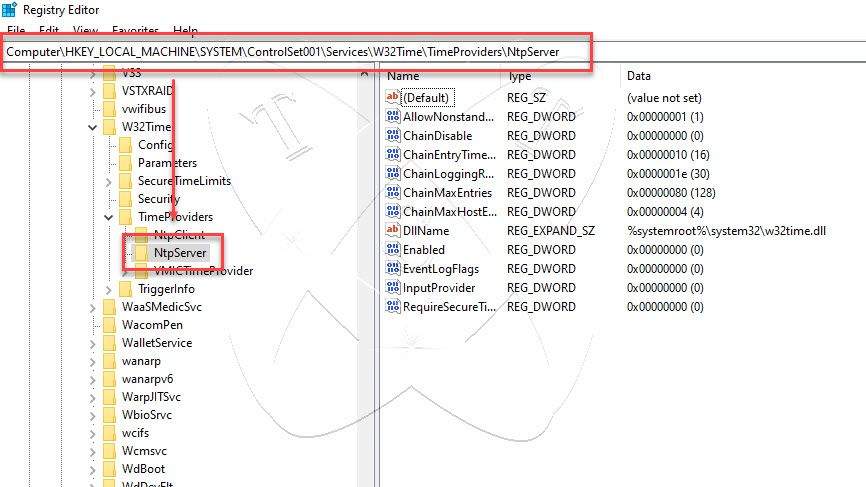
In the right-hand window, right-click on the value Enabled and select Modify the set the Enabled value to 1 to activate the NTP Server.
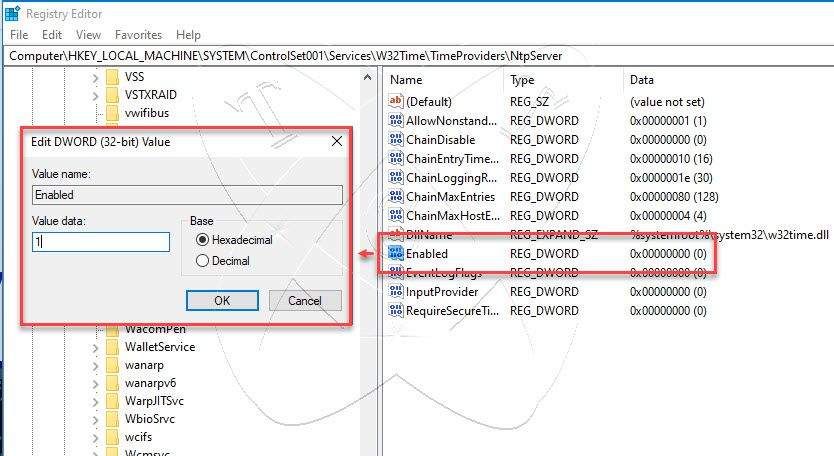
Once you have finished setting up, click OK and do not hastily close the Registry Editor window; we will proceed to step 2
Note: Before making changes to the Registry, ensure you have backed up important data and understand the implications of modifying the Registry.
Step 2 – Configure the AnnounceFlags
Before we begin, let’s see what is AnnounceFlag?
In the NTP server configuration on Windows Server, AnnounceFlag is a value that determines whether a server is considered a reliable time server controlled by the entry and announces its synchronized time to other machines in the network. This value specifies how the NTP server shares time information with other devices in the network.
- AnnounceFlag = 0: The server does not announce to any other servers. Time synchronization information is not shared.
- AnnounceFlag = 1: The server only announces to its upstream server. Time information is shared only with the upstream server.
- AnnounceFlag = 2: The server announces to its upstream server and also to other servers in the network. The NTP server shares time information more widely.
- AnnounceFlag = 3: The server announces to all other machines in the network, assuming it is a secondary server and does not retain time information from other servers.
- AnnounceFlag = 4: The server announces to all other machines in the network, assuming it is an authoritative server.
- AnnounceFlag = 5: Often understood as a combination of values 1 and 4. In this case, the NTP server will announce to its upstream server (value 1) and simultaneously assume that it is an authoritative server, announcing to all other machines in the network (value 4)
- AnnounceFlag = 8: The server does not make any announcements and only retains time synchronization information from its upstream server.
To configure AnnounceFlag, navigate to the following path:
Computer\HKEY_LOCAL_MACHINE\SYSTEM\CurrentControlSet\Services\W32Time\Config
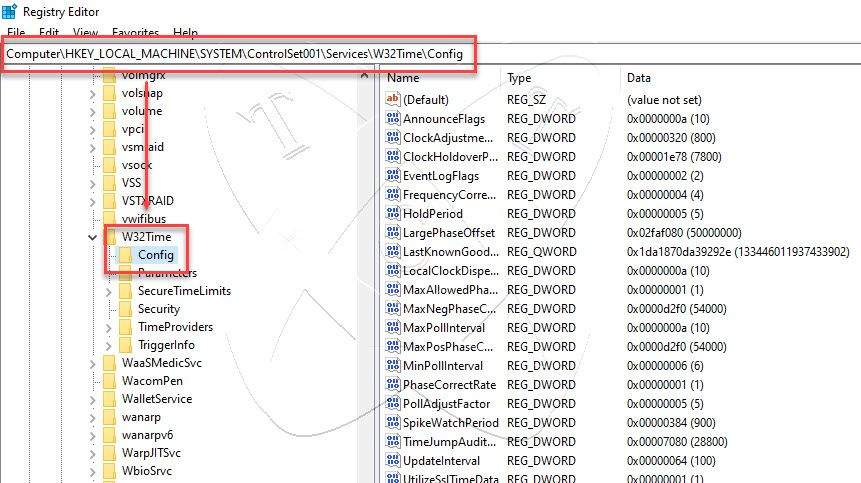
In the right-hand window, right-click on AnnounceFlag – choose Modify, and set the value of AnnounceFlag to 5
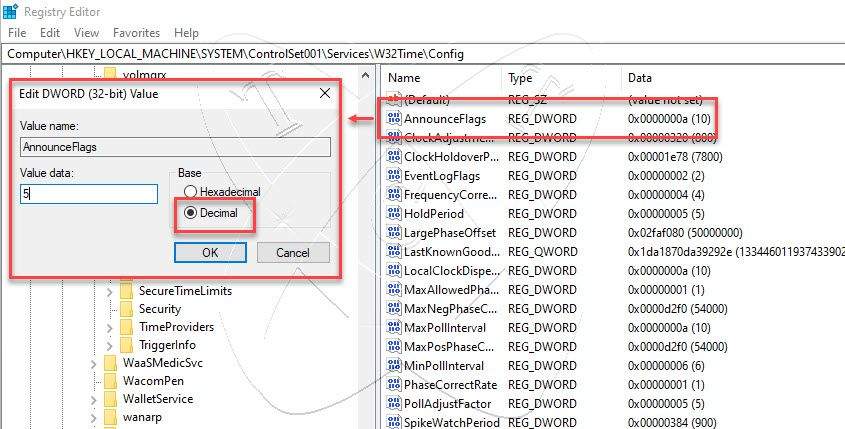
Once you have finished setting up, click OK and close Registry Editor.
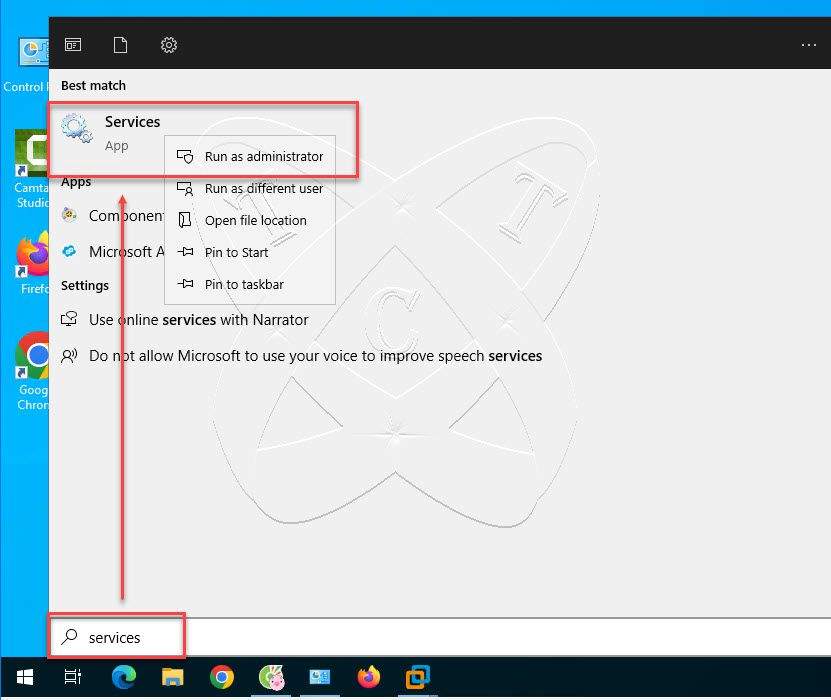
Step 3 – Restart Windows Time Service
You have now activated your Windows server as an NTP Server. To apply the changes, we need to restart the Windows Time service by pressing the Start button and entering service in the search bar, right-click on service – and select Run as Administrator.
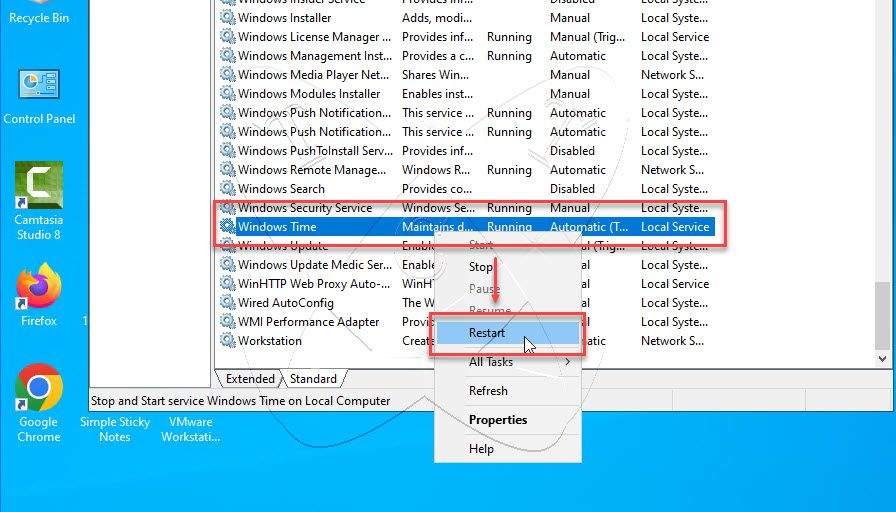
The Services window will appear. Locate and right-click on the Windows Time service, then select Restart
Step 4 – Adjust Firewall
By default, the NTP Server listens on port 123/UDP. If your server has an enabled firewall, open port 123/UDP to permit connections to the NTP Server and attain effective time synchronization
Read more: How to Open Ports in Windows Firewall on Windows
Conclusions
In this article, we have walked through the Installation and Configuration of an NTP Server on Windows Server, a crucial process to ensure accurate time synchronization within a network. By activating the NTP server and opening port 123/UDP on the firewall, we have established an effective environment for time synchronization across devices within the system.
Utilizing the NTP Server on Windows Server not only helps maintain time accuracy but also plays a vital role in ensuring performance and consistency in time-related processes, especially in large network environments and server systems.
Read more
- How to Install and Configure NTP Server on Ubuntu
- How to Install and Configure NTP Client on Windows: ✍️updating
- How to Install and Configure NTP Client on Ubuntu: ✍️ updating
- How to Install and Configure NTP Client on CentOS-based: ✍️ updating