Squid Proxy Server is a powerful tool for managing Internet traffic, accelerating access through caching mechanisms, and effectively controlling network access. This article provides a step-by-step guide to installing and configuring Squid on Ubuntu / Debian, suitable for both beginners and system administrators.
Step 1: Update the System
Before installing any software, it’s recommended to update your system to ensure all packages are up to date and stable. Open the terminal and run:
sudo apt update && sudo apt upgrade -y
Step 2: Install Squid Proxy
Once the system is updated, proceed to install Squid with the following command:
sudo apt install squid -y
This command automatically downloads and installs Squid from the official Ubuntu/Debian repositories.
After installation, you can check the status of the Squid service:
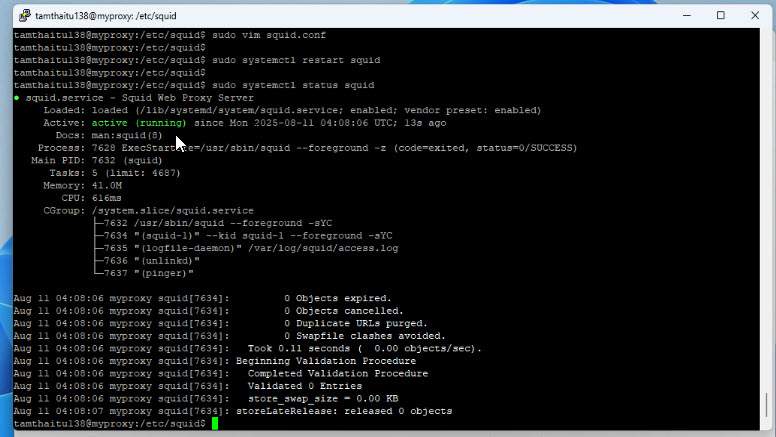
sudo systemctl status squid
If Squid is running, you will see the status line active (running)
Step 3: Backup the Original Configuration File
Before making any changes, back up the original configuration file in case you need to restore it later:
sudo cp /etc/squid/squid.conf /etc/squid/squid.conf.backup
Step 4: Edit the Configuration File
Open the default configuration file using vim or vi:
sudo vim /etc/squid/squid.conf
Once the file is open, press Esc and enter the command:
:1,$d

This command deletes all existing content in the file.
Next, add the following basic configuration:
### Configure Hostname
#
visible_hostname Your-Hostname
#
### Allow all
acl mynet src all
### Allow only your network to use the Squid Proxy
#acl mynet src Your-Network
#
###
#
acl SSL_ports port 443
acl Safe_ports port 80		# http
acl Safe_ports port 21		# ftp
acl Safe_ports port 443		# https
acl Safe_ports port 70		# gopher
acl Safe_ports port 210		# wais
acl Safe_ports port 1025-65535	# unregistered ports
acl Safe_ports port 280		# http-mgmt
acl Safe_ports port 488		# gss-http
acl Safe_ports port 591		# filemaker
acl Safe_ports port 777		# multiling http
#
###
#
http_access deny !Safe_ports
http_access deny CONNECT !SSL_ports
#
### Allow Local Network
http_access allow mynet
http_access allow localhost manager
http_access deny manager
include /etc/squid/conf.d/*.conf
http_access allow localhost
http_access deny all
#
### Default port 3128, you can change if you want.
http_port 3128
#
### Cache MEM =1/3 Physical RAM
cache_mem 512 MB
#
### Cache DIR
### Syntax : cache_dir ufs PATH L0 L1 L2
### L0 = 'Mbytes' is the amount of disk space (MB) to use under this directory.
### The default is 100 MB.  Change this to suit your configuration.
### L1 is the number of first-level subdirectories which will be created under the 'Directory'.
### The default is 16.
### 'L2' is the number of second-level subdirectories which will be created under each first-level directory.
### The default is 256.
cache_dir ufs /var/spool/squid 2048 16 256
#
### coredump_dir
### By default Squid leaves core files in the directory from where it was started.
### If you set 'coredump_dir' to a directory that exists, Squid will chdir() to that directory at startup and coredump files will be left there.
coredump_dir /var/spool/squid
#
### Default
refresh_pattern ^ftp:		1440	20%	10080
refresh_pattern ^gopher:	1440	0%	1440
refresh_pattern -i (/cgi-bin/|\?) 0	0%	0
refresh_pattern \/(Packages|Sources)(|\.bz2|\.gz|\.xz)$ 0 0% 0 refresh-ims
refresh_pattern \/Release(|\.gpg)$ 0 0% 0 refresh-ims
refresh_pattern \/InRelease$ 0 0% 0 refresh-ims
refresh_pattern \/(Translation-.*)(|\.bz2|\.gz|\.xz)$ 0 0% 0 refresh-ims
refresh_pattern .		0	20%	4320
After editing, press Esc, type :wq to save and exit.
Note: Replace the highlighted information with your own
Meaning of the lines:
- visible_hostname Your-Hostname : This line sets the visible hostname for the Squid Proxy server. It will appear in Squid’s error messages or logs. You can replace
Your-Hostnamewith your actual domain name or server hostname. - acl mynet src all :
aclstands for Access Control List. This command creates an ACL namedmynetthat includes all IP addresses (src all) as part of this group. - http_access allow mynet : This line allows all IP addresses in the
mynetgroup to access the proxy. Sincemynetcontains “all”, it means all IPs are allowed to connect. - http_port 3128 : The port on which Squid Proxy listens for incoming client connections. The default is 3128, but you can change it if needed.
- cache_mem 512 MB : The amount of RAM that Squid uses for caching web data. Here it is set to 512 MB. If you have more RAM, you can increase this value for faster access.
- cache_dir ufs /var/spool/squid 2048 16 256 : This sets up the on-disk cache directory
- ufs: storage format for cache (traditional).
- /var/spool/squid: the directory where cache is stored.
- 2048: maximum cache size on disk (MB).
- 16: number of first-level subdirectories.
- 256: number of second-level subdirectories
Step 6: Restart the Squid Service
To apply the changes, restart the Squid service:
sudo systemctl restart squid
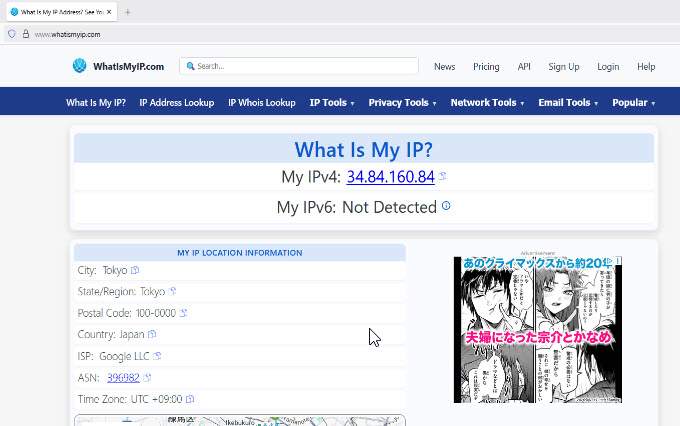
Step 7: Test Proxy Functionality
On a client machine, configure the browser or system to use the Squid server’s IP address and the configured port (e.g., 192.168.1.10:3128).
To verify, you can visit the whatismyip website. If the result shows your Server’s IP address, it means your connection is successfully routed through the Server:
Advanced Configuration Options
- User Authentication: Squid supports authentication via LDAP, PAM, or
.htpasswdfiles. - Website Blocking: You can configure blacklists to restrict access to unwanted websites.
- Bandwidth Limiting: Use delay pools to control access speed based on user groups.
Conclusion
Squid Proxy is an effective solution for managing Internet access in both enterprise and personal environments. With the installation and configuration steps above, you can deploy a stable and manageable proxy system.