Welcome to the How to Set Up a Static IP Address on Ubuntu Desktop article. In today’s interconnected world, using a static IP address is crucial for maintaining stability and easy management when working with computers. On the Ubuntu Desktop operating system, setting up a static IP address not only ensures a reliable network connection but also enables easy access to internal network services.
In this article, we will explore how to easily and quickly set up a static IP address on Ubuntu Desktop. We will start with the basic and straightforward steps, and then move on to more detailed instructions for customizing your network. Additionally, we will explain important concepts such as subnet mask, gateway, and DNS server, providing you with a better understanding of network configuration.
Whether you are a beginner or an experienced Ubuntu user, this guide will equip you with the necessary knowledge to set up a static IP address on Ubuntu Desktop. By doing so, you will gain better control over your network and improve your computer working experience.
Read more
- How to Install Ubuntu Server 23 on VMware Workstation
- How to Install Ubuntu 23 (Lunar Lobster) Desktop on VMware Workstation
- How to Change Hostname and FQDN/Fullname on Linux
- How to Configure Static IP Address on Ubuntu Server
- How to Install Webmin on Ubuntu / Debian / Linux Mint
Step 1 – Open Network Settings
On the desktop screen, click on the Network icon in the top-right corner and then select Settings option.

Step 2 – Edit Network Connection
In the Settings window, choose the Network tab from the left sidebar and then click on the Setting icon of the network connection you want to set a static IP address.

Step 3 – Set up a static IP Address on Ubuntu Desktop
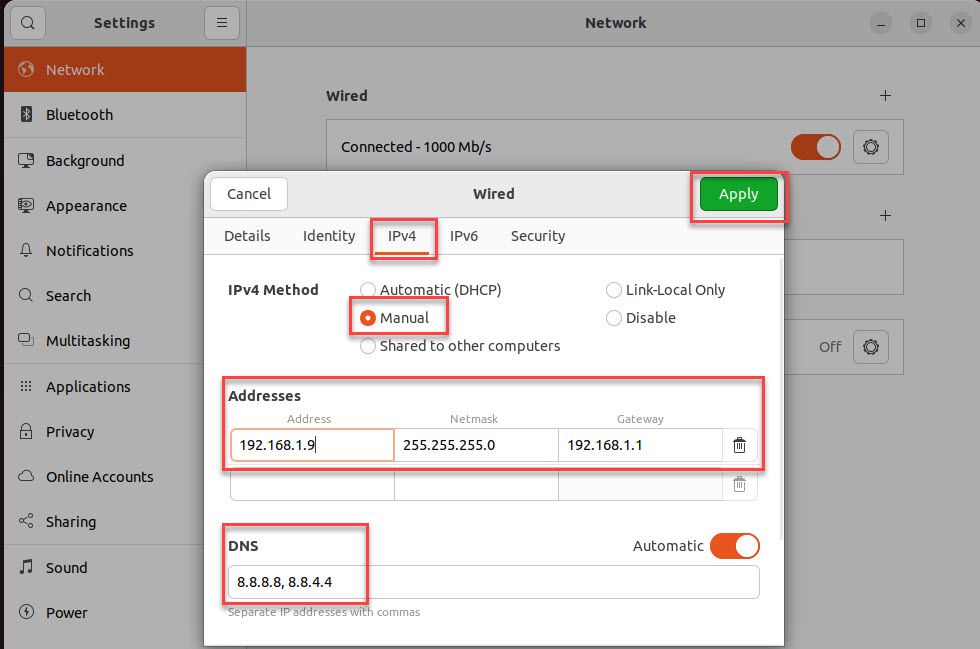
In the network connection window, select the IPv4 tab and set up as shown below:
- IPv4 Method: Manual
- Addresses:
- IP Address: enter your IP address
- Netmask: enter your Subnet Mask
- Gateway: enter your Gateway
- DNS: enter your DNS servers, separating each address with a comma
After you’re done, click on Apply button to apply the changes.
Return to the Settings window, Turn-off and then Turn-on your network connection for the system to apply the new IP address.

Step 4 – Verify
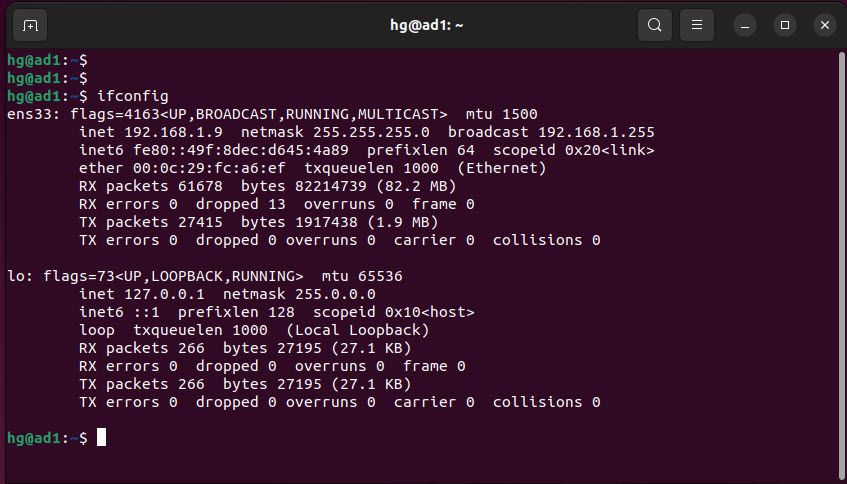
To check if the system has successfully acquired the new IP address, open the Terminal (Ctrl + Alt + T) and enter the following command:
ifconfig
You will see information about your IP address.
That’s it. Wishing you success!
Thank you for reading !!!