Hello everyone, in this article, we will explore the most Basic Records for a Mail Server and How to set it up on a Domain. Let’s find out together
To set up a functioning Mail Server on the Internet, two key elements are necessary: A static IP address and a unique Domain name.
- Static IP Address: A static IP address is a fixed network address that doesn’t change. It ensures your mail server has a consistent address that other devices on the internet can use to send emails. A static IP address establishes your server’s identity on the network, enabling seamless sending and receiving of emails.
- Domain Name: A domain name is an easy-to-remember identifier for your mail server, including both the server name (e.g., mail) and the domain (e.g., example.com). When users send emails to addresses like [email protected], the system uses the domain name to determine the corresponding mail server.
You need to link these two elements: set up Domain Name System (DNS) records on your domain to specify your mail server’s static IP address. This allows the internet system to route emails to your mail server whenever someone sends an email to your address. Once you correctly configure both of these elements, your mail server will be ready to send and receive emails on the internet.
Basic Records for a Mail Server
To make it easier to visualize, let’s assume the following:
- The domain name I’m using: totatca.xyz
- Public static IP address: 43.224.33.183
- Hostname: mail
- FQDN/Fullname: mail.totatca.xyz
A (Address) Record
An A (Address) record in the Domain Name System (DNS) maps a domain name to an IP address. When a computer or device connects to the internet, it uses DNS to convert human-readable domain names into specific IP addresses, enabling the internet infrastructure to locate the exact server it needs to connect to.
In the case of a Mail Server, an A record associates the domain name of the mail server (for example: mail.totatca.xyz ) with its corresponding IP address. By setting up an A record for a Mail Server, other computers or devices can use the domain name to find the IP address of the Mail Server. This allows them to establish a connection and send or receive emails.
For instance, if you set up an A record for the domain mail.totatca.xyz and link it to the IP address A.B.C.D, when someone wants to send an email to [email protected], they use DNS to find the IP address of the Mail Server by querying the A record for the domain mail.totatca.xyz. Subsequently, they connect to the IP address A.B.C.D to send the email to the recipient.
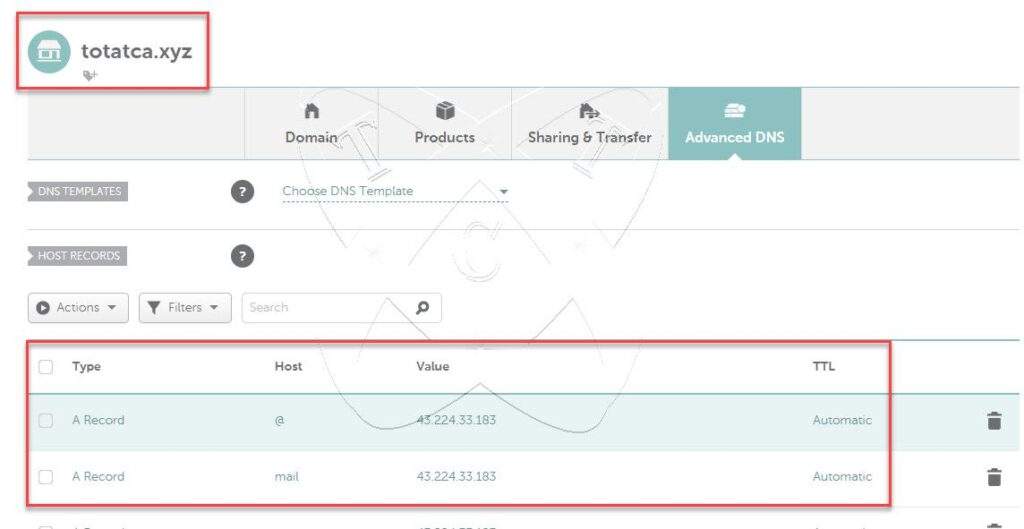
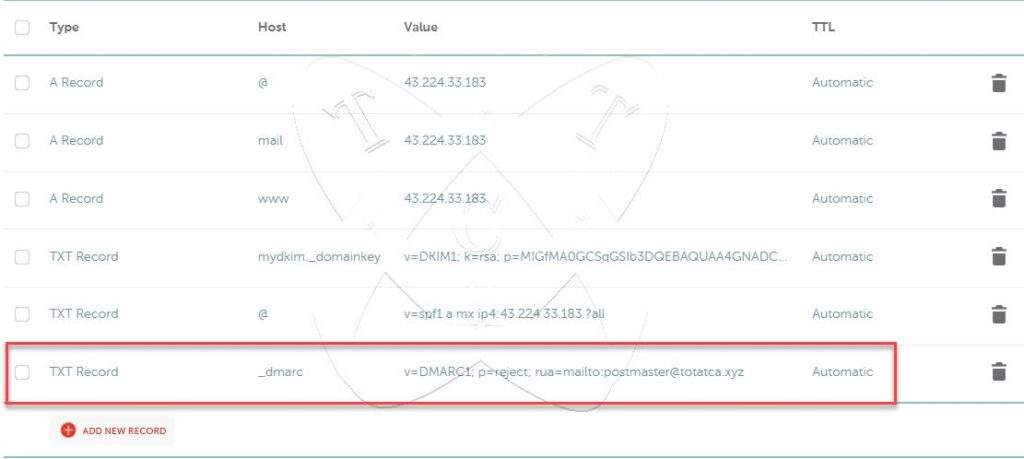
To create an A record, you need to log in to the domain’s administration page and create 2 A records as follows
- First A record
- Type: A
- Host: @
- Value: IP-of-the-Server
- TTL: Automatic
- Second A record
- Type: A
- Host: mail
- Value: IP-of-the-Server
- TTL: Automatic
MX record
The MX (Mail Exchange) record in the Domain Name System (DNS) specifies a Mail Server that will handle emails for a specific domain. When you send an email to an address like [email protected], your email system uses DNS to find out which Mail Server it needs to send the email to. The MX record is the tool that enables this.
The MX record contains two main pieces of information:
- Priority: This is a positive integer that indicates the priority of the MX server. When there are multiple MX records for the same domain, email servers will attempt to connect to the server with the lowest priority first. If it can’t connect to this server (for example, if it’s down), the system will try the server with the next highest priority.
- Mail Server Domain Name: This is the domain name of the Mail Server. When the email system needs to send an email to an address within this domain, it will use the IP address of the Mail Server specified in the corresponding A or AAAA record for this domain.
For example, if you set up an MX record with a priority of 10 and the Mail Server domain name is mail.totatca.xyz, when someone sends an email to the address [email protected], their email system will use DNS to find the MX record for the domain totatca.xyz. It will discover that the Mail Server with priority 10 is running at the address mail.totatca.xyz. The system will send the email to the IP address corresponding to the Mail Server at mail.totatca.xyz for further delivery.
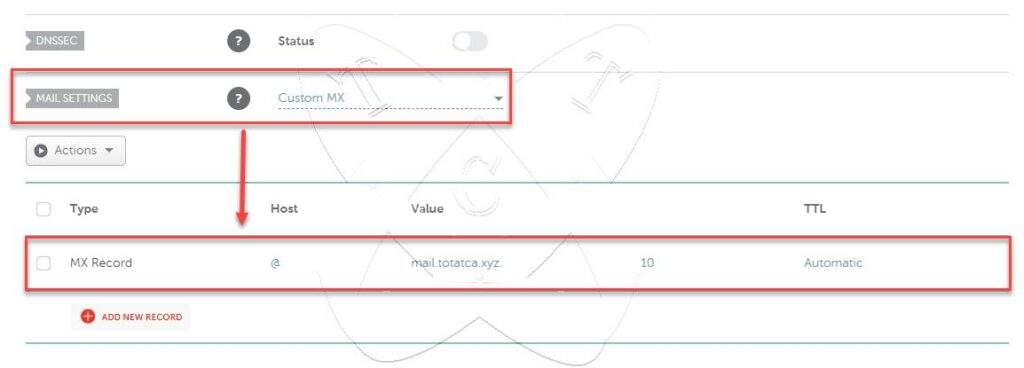
You need to create an MX record with the following information:
- Type: MX Record
- Host: @
- Value: mail.totatca.xyz
- Priority: 10
- TTL: Automatic
PTR record
The PTR (Pointer Record) in the Domain Name System (DNS) maps an IP (Internet Protocol) address to a domain name. Typically, reverse DNS lookups use PTR records to find the corresponding domain name when you have an IP address
For Mail Servers, the PTR record establishes a reverse relationship from the server’s IP address to its domain name. This can be useful to verify the credibility of the email server. Some Mail Servers check if the sending IP address has a valid PTR record, and if not, they might consider the email invalid or mark it as spam.
By setting up a PTR record for your Mail Server, you provide a way for the recipient’s email system to check if the sending IP address is associated with a valid domain name. This helps improve credibility and reduces the likelihood of your emails being terminated or labeled as spam.
To create a PTR record, there are two common scenarios:
- If you are using a physical server and an Internet connection with a static public IP address, you need to contact your ISP (Internet Service Provider) to request them to create a PTR record for you.
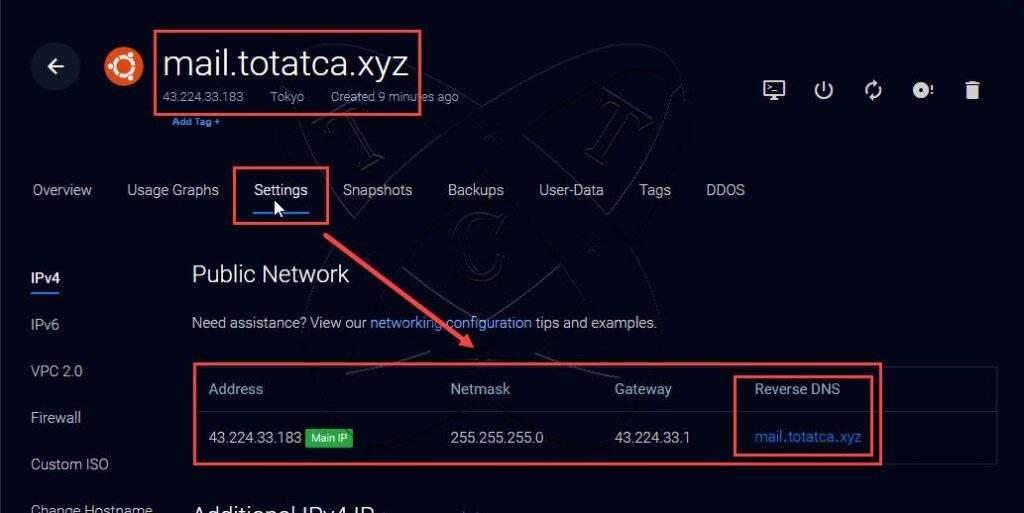
- If you are using a VPS, you need to check if your provider allows you to open port 25. For example, I use Vultr, and they allow port 25. To create a PTR record, you simply need to specify the Fully Qualified Domain Name (FQDN)/Fullname of your server as shown in the figure below:
SPF Record
The SPF (Sender Policy Framework) record is part of the email authentication system designed to prevent email address forgery. When you set up an SPF record for your domain, you enable other email servers to identify the authorized server that can send emails on behalf of your domain. This helps email recipients determine if an email sent from that domain is legitimate.
SPF works by establishing a list of allowed IP addresses authorized to send emails on behalf of your domain. When an email server receives an email from your domain, it can look up the SPF record of that domain to verify if the sending server’s IP address is permitted. If the IP address is not listed in the allowed addresses, the email may be marked as spam or rejected.
SPF is an effective way to prevent email spoofing and helps identify the true origin of emails.
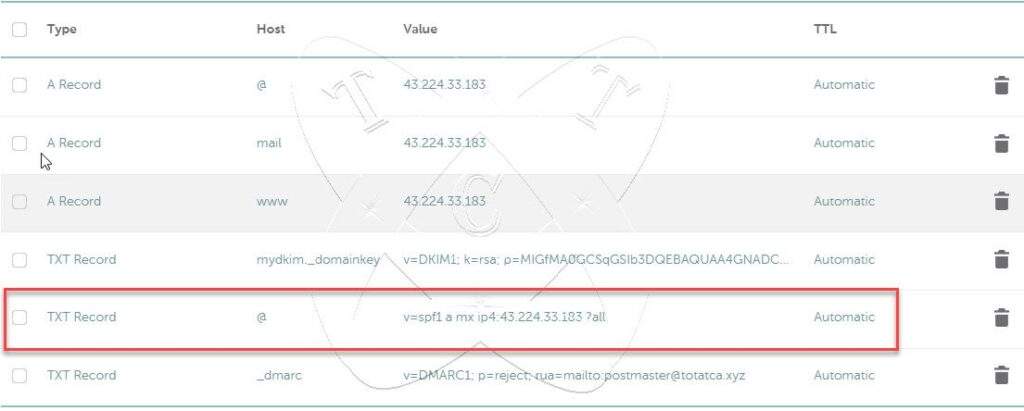
Create an SPF record with the following information:
- Type: TXT Record
- Host: @
- Value: v=spf1 a mx ip4:43.224.33.183 ?all
- TTL: Automatic
DMARC Record
The DMARC (Domain-based Message Authentication, Reporting, and Conformance) record is an email authentication standard designed to enhance email security and prevent email spoofing. By specifying policies for your domain, DMARC helps email senders configure how to handle emails that are not valid or are forged and sent from their domain.
DMARC works by combining email authentication standards such as SPF (Sender Policy Framework) and DKIM (DomainKeys Identified Mail). It allows email senders to set rules for verifying the IP address of the sending email server (SPF) and authenticating the digital signature of the email (DKIM). If an email does not comply with the defined DMARC policies, email recipients can be instructed on how to handle that email (e.g., sending it to the spam folder or rejecting it).
An important aspect of DMARC is its ability to provide reporting to senders about their actions, helping them understand how the Internet handles their emails and allowing them to monitor the use of their domain. This helps improve safety for email recipients and builds trust in sending emails from specific domains.
Create an SPF record with the following information:
- Type: TXT Record
- Host: _dmarc
- Value: v=DMARC1; p=reject; rua=mailto:[email protected]
- TTL: Automatic
Verify the records
After creating the records, we also need to verify if they are set up correctly. To simplify, let’s access the MX toolbox website to check.
For instance, in the case of the MX record, if the returned result matches the image below, it indicates that the record has been created correctly.
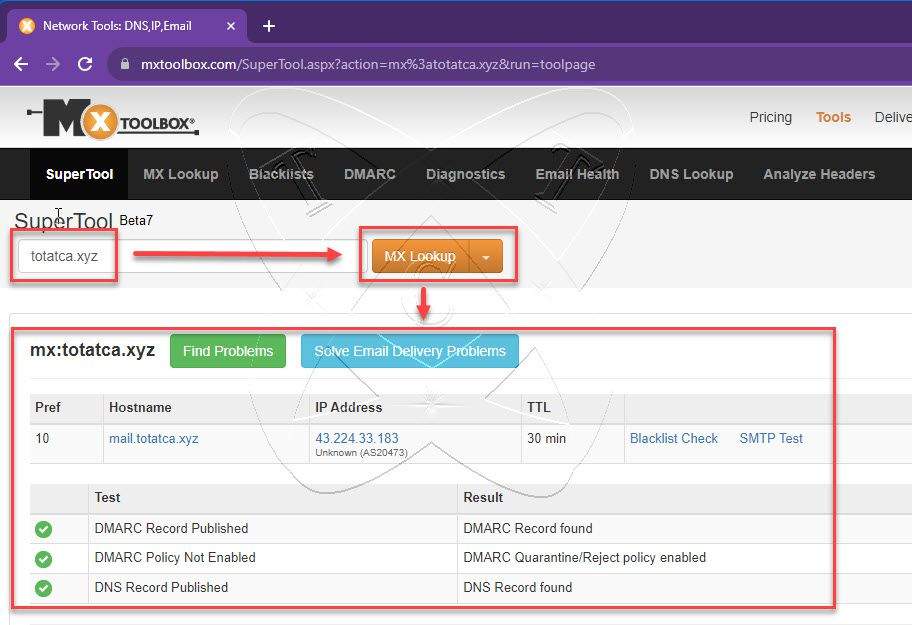
Similar to other records (A, SPF, DMARC), you can also verify whether you have set it up correctly.
Conclusion
Additionally, another crucial record called DKIM exists. However, we will explore this in a specific article within the Mail Server series.