Hello everyone. In this guide, we will walk through the process of Installing and Configuring MySQL Server on the Ubuntu operating system.
What is MySQL?
MySQL is a popular open-source relational database management system (RDBMS) known for its reliability, flexibility, and ease of use. It is widely used for various applications ranging from simple web applications to complex data-driven platforms. MySQL is a key component of the LAMP (Linux, Apache, MySQL, PHP/Python/Perl) stack, making it a popular choice for web development.
Features of MySQL
- Open Source: MySQL is an open-source software, that allows users to view, modify, and distribute its source code under the terms of the GNU General Public License (GPL). This open nature encourages collaboration and continuous improvement by a global community of developers.
- Relational Database: MySQL is a relational database, meaning it organizes data into tables with rows and columns, allowing efficient data storage and retrieval. It supports SQL (Structured Query Language) for querying and manipulating data.
- Scalability: MySQL can handle large volumes of data and high traffic loads. It offers various replication and clustering options to distribute the workload and ensure high availability.
- Ease of Use: MySQL is known for its simplicity and ease of use. It provides a user-friendly interface and extensive documentation, making it accessible for both beginners and experienced developers.
- Security: MySQL offers robust security features, including password encryption, user authentication, and access control. It supports SSL encryption for secure data transmission between client and server.
- Compatibility: MySQL is compatible with various operating systems, including Linux, Windows, macOS, and different programming languages, making it versatile and widely adopted.
- Community Support: MySQL has a large and active community of users and developers. This community-driven approach ensures ongoing support, regular updates, and a wealth of resources for troubleshooting and learning.
Prerequisites
- Operating system: A Ubuntu server ( Ubuntu Desktop or Ubuntu Server)
- User privileges: root or non-root user with sudo privileges.
Read more
- How to Install and Configure OpenVPN Server on Ubuntu
- How to Install MongoDB Community Edition 5/6 on Ubuntu 22.04 20.04 18.04 LTS
- How to Install and Configure Nagios Core Server on Ubuntu/Debian/Linux Mint
- How to Install and Configure NextCloud Server on Ubuntu
- How to Install and Configure RocketChat Server on Ubuntu 22.04 | 20.04 LTS
Step by step Install MySQL Server on Ubuntu
Step 1 – Update Package Repository
Before installing any new software, it’s a good practice to update the package repository to ensure you are installing the latest version. Open the terminal and run the following command:
sudo apt update
Step 2 – Install MySQL Server
After updating the package repository, execute the following command to install the MySQL server.
sudo apt install mysql-server mysql-client -y
After installation is complete, start and enable the MySQL service to automatically start with the system every time it restarts using the following command:
sudo systemctl start mysql
sudo systemctl enale mysql
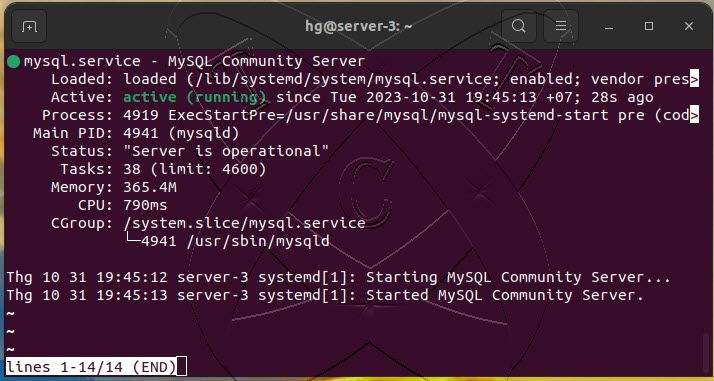
Check the status of the MySQL service to ensure that it is running on your system using the following command:
sudo systemctl status mysql
If correct, you should see results similar to the image below:
Step 3 – Configure Secure MySQL Server
MySQL is installed with a root account without a password. To secure the MySQL server, you should run the following command to set a password for the root account:
sudo mysql_secure_installation
You will be required to enter a new password for the root account and configure other security options such as deleting the anonymous account and disabling remote login as follows:
hg@server-3:~$ sudo mysql_secure_installation

Securing the MySQL server deployment.

Connecting to MySQL using a blank password.

VALIDATE PASSWORD COMPONENT can be used to test passwords
and improve security. It checks the strength of password
and allows the users to set only those passwords which are
secure enough. Would you like to setup VALIDATE PASSWORD component?

Press y|Y for Yes, any other key for No: n   <= Type N and hit Enter

Skipping password set for root as authentication with auth_socket is used by default.
If you would like to use password authentication instead, this can be done with the "ALTER_USER" command.
See https://dev.mysql.com/doc/refman/8.0/en/alter-user.html#alter-user-password-management for more information.

By default, a MySQL installation has an anonymous user,
allowing anyone to log into MySQL without having to have
a user account created for them. This is intended only for
testing, and to make the installation go a bit smoother.
You should remove them before moving into a production
environment.

Remove anonymous users? (Press y|Y for Yes, any other key for No) : y   <= Type Y and hit Enter
Success.


Normally, root should only be allowed to connect from
'localhost'. This ensures that someone cannot guess at
the root password from the network.

Disallow root login remotely? (Press y|Y for Yes, any other key for No) : y   <= Type Y and hit Enter
Success.

By default, MySQL comes with a database named 'test' that
anyone can access. This is also intended only for testing,
and should be removed before moving into a production
environment.


Remove test database and access to it? (Press y|Y for Yes, any other key for No) : y     <= Type Y and hit Enter
 - Dropping test database...
Success.

 - Removing privileges on test database...
Success.

Reloading the privilege tables will ensure that all changes
made so far will take effect immediately.

Reload privilege tables now? (Press y|Y for Yes, any other key for No) : y   <= Type Y and hit Enter
Success.

All done!
hg@server-3:~$
Now, log in to the MySQL server using the following command:
sudo mysql
Execute the following command to change the Authentication plugin for the root account from Socket Authentication to Native MySQL Authentication and set a password for the root account:
ALTER USER root@localhost IDENTIFIED WITH mysql_native_password BY
'Your-Password';FLUSH PRIVILEGES;
EXIT;
Step 4 – Adjust Firewall
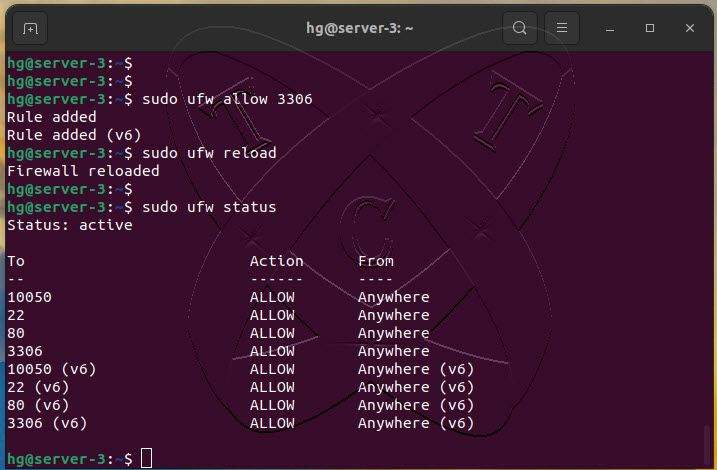
If you are using a firewall on your server and need to connect remotely to the MySQL server, make sure that port 3306 (or the port you have configured MySQL to listen on) is open to allow connections to the MySQL server using the following command:
Read more: How to Configure UFW Firewall on Linux Ubuntu | Debian | LinuxMint
Note: Skip this step if you are not using the UFW firewall.
sudo ufw allow 3306
sudo ufw reload
sudo ufw status
Conclusion
In summary, installing MySQL Server on Ubuntu is a fundamental yet crucial process for establishing a reliable and efficient database management system. By following the steps outlined in this guide, you have successfully installed MySQL Server on the Ubuntu operating system, secured the installation, and gained access to a powerful database platform. Utilize MySQL to store and manage your data on your Ubuntu system, empowering you to build applications and projects with stability and optimal performance