In the Linux operating system, installing software packages can sometimes become complex, especially when you are using CentOS, CentOS Stream, Rocky Linux, AlmaLinux, or RHEL. However, there is a simple and effective solution for managing software packages on these Linux distributions, and that is by using the Remi Repo.
Remi Repo is a supplementary software repository that provides available software packages for popular Linux distributions such as CentOS, CentOS Stream, Rocky Linux, AlmaLinux or RHEL. With Remi Repo, you can easily access and install the necessary software, libraries, and tools to develop and manage your Linux system.
In this article, we will explore How to Install the Remi Repo on CentOS, CentOS Stream, Rocky Linux, AlmaLinux or RHEL. We will provide you with detailed steps, from installing Remi Repo to configuring and using it to install desired software packages.
Continue reading to learn how to install Remi Repo and leverage its full potential in managing your Linux system.
Prerequisites
- Operating system:
- CentOS 7/8
- CentOS Stream 8/9
- RockyLinux 8/9
- AlmaLinux 8/9
- RHEL 7/8/9
- User privileges: root or non-root with sudo privileges.
Step 1 – Install EPEL Repository
The EPEL Repo needs to be installed and enabled before proceeding with the installation of the Remi Repo. By doing so, you will have the necessary repositories in place to access and install software packages from the Remi Repo
Read: How to Install EPEL Repository on CentOS/CentOS Stream/RHEL/RockyLinux/AlmaLinux
Step 2 – Install Remi Repo in CentOS | Rocky | Alma | RHEL
Once the EPEL Repo is installed and enabled, you can now proceed to install the Remi Repo on your system.
On CentOS 9, CentOS Stream 9, AlmaLinux 9, Rocky Linux 9 or RHEL 9
Run the following command to install the Remi Repo on CentOS 9/CentOS Stream 9/RockyLinux 9/AlmaLinux 9/RHEL 9
sudo dnf install https://rpms.remirepo.net/enterprise/remi-release-9.rpm -y
sudo dnf update -y
On CentOS 8, CentOS Stream 8, AlmaLinux 8, Rocky Linux 8 or RHEL 8
Run the following command to install the Remi Repo on CentOS 8/CentOS Stream 8/RockyLinux 8/AlmaLinux 8/RHEL 8
sudo dnf install https://rpms.remirepo.net/enterprise/remi-release-8.rpm -y
sudo dnf update -y
On CentOS 7 or RHEL 7
Run the following command to install the Remi Repo on CentOS 7/RHEL 7
sudo yum install https://rpms.remirepo.net/enterprise/remi-release-7.rpm -y
sudo yum update -y
Step 3 – Verify Remi Repositories
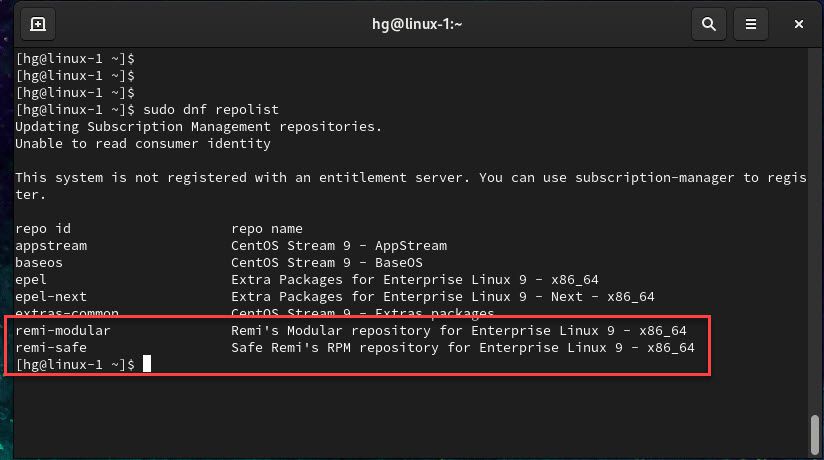
After installing the Remi Repo, the next step is to verify that the Remi repositories have been properly set up and functioning on your system. To do this, run the following command to list all active repositories on your system:
On CentOS 8/9 | CentOS Stream 8/9 | RockyLinux 8/9 | AlmaLinux 8/9 | RHEL 8/9
sudo dnf repolist
On CentOS 7 | RHEL 7
sudo yum repolist
In the displayed results, you will see a list of the repositories currently present on your system. Check if there are two Remi repositories listed: remi-safe and remi-modular as shown below:
Conclustion
That’s it! Through this article, you have successfully installed and enabled the Remi Repo on your system. In the upcoming articles, we will explore together How to Install different versions of PHP on CentOS/CentOS Stream/RockyLinux/AlmaLinux/RHEL systems.
Stay tuned for the next articles, where we will guide you through the process of installing PHP versions according to your specific requirements.
Thank you for reading !!!