Welcome to this article on Installing and Configuring Zabbix Proxy Server on Ubuntu/Debian!
Zabbix is a popular open-source monitoring system that is used to monitor the performance and health of network devices, servers, applications, and services.
Zabbix Proxy Server acts as an intermediary between the Zabbix Server and the Agents installed on the devices to be monitored, helping to reduce the load on the Zabbix Server and improve overall monitoring performance.
Get started with installing Zabbix Proxy Server today to enhance your system monitoring!
Diagram
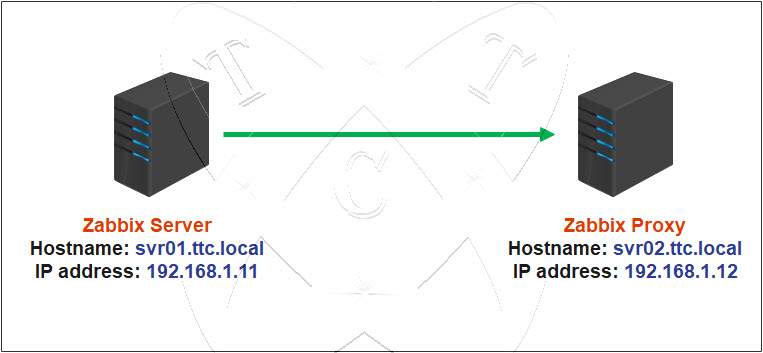
In which:
- Zabbix Server
- Hostname: svr01.ttc.local
- IP address: 192.168.1.11
- Zabbix Proxy
- Hostname: svr02.ttc.local
- IP address: 192.168.1.12
- Operating system: Ubuntu | Debian | Linux Mint | Debian-based
Prerequisites
- Zabbix Server has been installed on the server svr01.ttc.local (192.168.1.11)
- MySQL/MariaDB has been installed on the server svr02.ttc.local (192.168.1.12)
Read more: How to Install and Configure MySQL Server on Ubuntu
Or: How to Install and Configure MariaDB Server on Ubuntu - Zabbix Proxy must run the same major version as the Zabbix Server.
For example, if you are using Zabbix Server version 6.0 LTS, then Zabbix Proxy must also be version 6.0 LTS.
Read more
- How to Install and Configure Zabbix Server 6 LTS on Ubuntu/Debian
- How to Install and Configure Zabbix Server 6 LTS on CentOS/RockyLinux/AlmaLinux
- How to Setup A Static IP Address on Ubuntu Server
- How to Change Hostname/FQDN on Linux
- How to Install and Configure GLPI on Ubuntu
On the Zabbix Proxy Server (svr02.ttc.local | 192.168.1.12)
Step 1 – Update system
Before starting, update the repository for your system using the command below:
sudo apt update && sudo apt upgrade -y
Step 2 – Install Zabbix Repository
Access the official Zabbix website and select the correct operating system platform, Zabbix version, and the Zabbix components you want to use as below:
For example:
- My Zabbix server is using version 6.0 LTS
- OS: Ubuntu
- Zabbix Components: Proxy
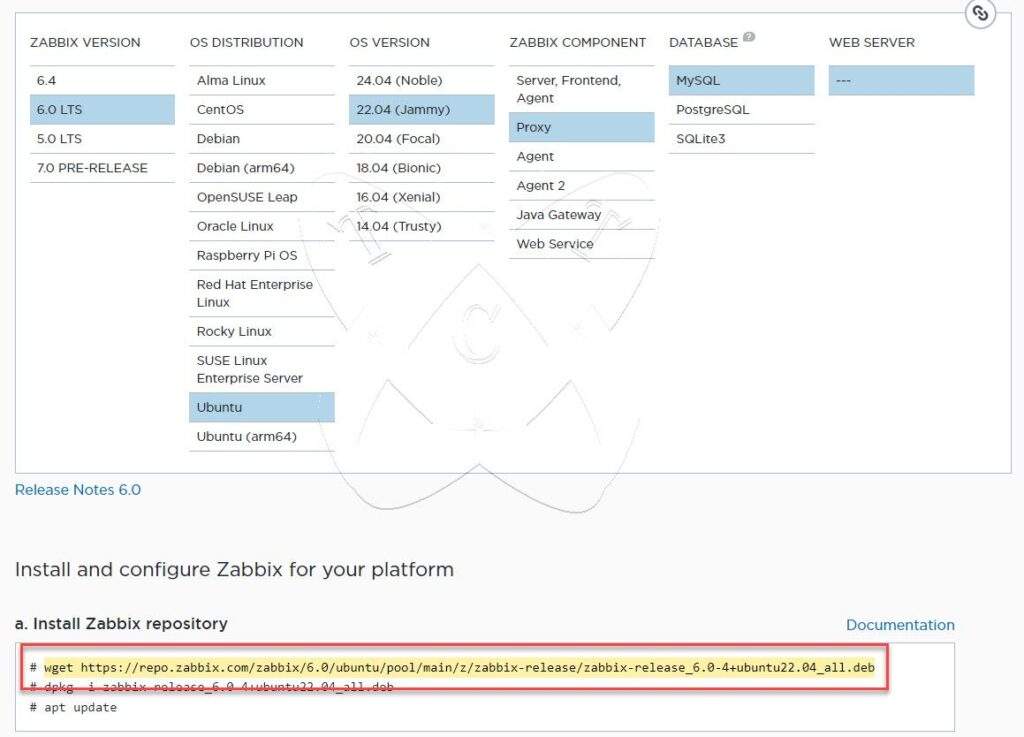
Copy the provided link and paste it into your terminal window to download the Zabbix repository:
sudo wget https://repo.zabbix.com/zabbix/6.0/ubuntu/pool/main/z/zabbix-release/zabbix-release_6.0-4+ubuntu22.04_all.deb
Next, execute the command below to install the Zabbix Repository on your system:
sudo dpkg -i zabbix-release_version_you_are_using
For example:
sudo dpkg -i zabbix-release_6.0-4+ubuntu22.04_all.deb
Execute the command below to update the repository for your system:
sudo apt update
Step 3 – Install the Zabbix Proxy Server
After successfully installing the Zabbix Repository, execute the command below to install Zabbix Proxy and its components on your machine:
sudo apt install zabbix-proxy-mysql zabbix-sql-scripts -y
Once installed, start and enable Zabbix Proxy to launch with the system:
sudo systemctl start zabbix-proxy
sudo systemctl enable zabbix-proxy
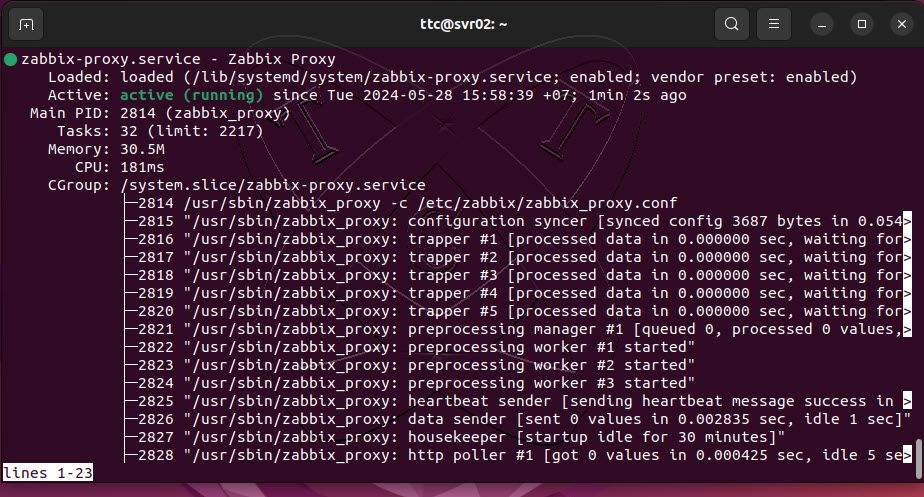
Don’t forget to check the status of the Zabbix Proxy service to ensure that it is running on your system:
sudo systemctl status zabbix-proxy
Step 4 – Create a database for the Zabbix Proxy Server
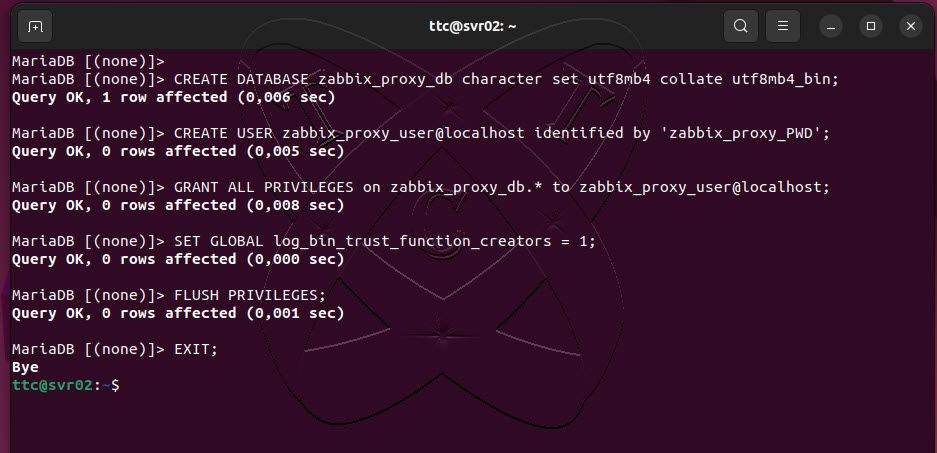
Log in to your MySQL/MariaDB server:
sudo mysql -uroot -p
Create a new database named zabbix_proxy_db using the command below:
CREATE DATABASE zabbix_proxy_db character set utf8mb4 collate utf8mb4_bin;
Next, create a user database named zabbix_proxy_user with the password zabbix_proxy_PWD using the command below:
CREATE USER zabbix_proxy_user@localhost identified by
'zabbix_proxy_PWD';
Grant all privileges on the zabbix_proxy_db database to the zabbix_proxy_user account:
GRANT ALL PRIVILEGES on zabbix_proxy_db.* to zabbix_proxy_user@localhost;
Next, to enable the backup and restoration of user-defined functions, run the following command to ensure that user-defined functions are identified and logged in the binary log:
SET GLOBAL log_bin_trust_function_creators = 1;
Now, reload and exit the database server:
FLUSH PRIVILEGES;
EXIT;
Step 5 – Configure Database for Zabbix Proxy Server
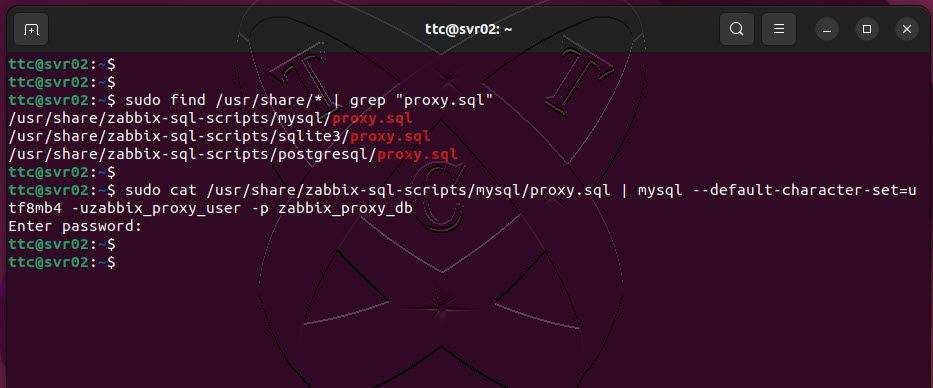
First, we need to find the full path to where the schema of the Zabbix Proxy database is stored using the following command:
sudo find /usr/share/* | grep
"proxy.sql"
From the output, the location where my database schema is stored is: /usr/share/zabbix-sql-scripts/mysql/proxy.sql (it may vary for you)
Now, import the schema into that database you created in step 4 using the following command (remember to replace the database information with yours):
sudo cat /usr/share/zabbix-sql-scripts/mysql/proxy.sql | mysql
--default-character-set=utf8mb4 -uzabbix_proxy_user -p zabbix_proxy_db
At the password prompt, enter the password of the database user zabbix_proxy_user created in step 4, in this example it is zabbix_proxy_PWD
In step 4, we enabled log_bin_trust_function_creators. After finishing, disable it by logging back into MySQL/MariaDB and executing the following commands:
sudo mysql -uroot -p
set global log_bin_trust_function_creators = 0;
flush privileges;
exit;

Step 6 – Configure Zabbix Proxy Server
Using your favorite text editor, open the configuration file of the Zabbix Proxy Server with the following command:
sudo vim /etc/zabbix/zabbix_proxy.conf
Edit some contents as below (highlighted lines):
Note: The choice between these two modes depends on network configuration, performance requirements, and the level of management and control desired over your network.
- Active Mode: In this mode, the Zabbix Proxy actively sends collected information, such as parameter values and alerts, to the Zabbix server. The Zabbix Proxy manages its own schedule and method of sending data to the Zabbix server. This helps to reduce the load on the Zabbix server by allowing the Zabbix Proxy to handle some of the data collection and processing tasks.
- Passive Mode: In this mode, the Zabbix server initiates connections to the Zabbix Proxy to retrieve collected data. The Zabbix Proxy simply waits and accepts connections from the Zabbix server and sends data when requested by the Zabbix server. While this may introduce some load on the Zabbix server, this mode is suitable when the Proxy cannot initiate connections to the Zabbix server due to firewall restrictions or network configurations.
# This is a configuration file for Zabbix proxy daemon
# To get more information about Zabbix, visit http://www.zabbix.com

############ GENERAL PARAMETERS #################

### Option: ProxyMode
#	Proxy operating mode.
#	0 - proxy in the active mode
#	1 - proxy in the passive mode
#
# Mandatory: no
# Default:
ProxyMode=0

### Option: Server
#	If ProxyMode is set to active mode:
#		IP address or DNS name (address:port) or cluster (address:port;address2:port) of Zabbix server to get configuration data from and send data to.
#		If port is not specified, default port is used.
#		Cluster nodes need to be separated by semicolon.
#	If ProxyMode is set to passive mode:
#		List of comma delimited IP addresses, optionally in CIDR notation, or DNS names of Zabbix server.
#		Incoming connections will be accepted only from the addresses listed here.
#		If IPv6 support is enabled then '127.0.0.1', '::127.0.0.1', '::ffff:127.0.0.1' are treated equally
#		and '::/0' will allow any IPv4 or IPv6 address.
#		'0.0.0.0/0' can be used to allow any IPv4 address.
#		Example: Server=127.0.0.1,192.168.1.0/24,::1,2001:db8::/32,zabbix.example.com
#
# Mandatory: yes
# Default:
# Server=
# IP of Zabbix Server
Server=192.168.1.11

### Option: Hostname
#	Unique, case sensitive Proxy name. Make sure the Proxy name is known to the server!
#	Value is acquired from HostnameItem if undefined.
#
# Mandatory: no
# Default:
# Hostname=
# Hostname of Zabbix Proxy Server
Hostname=svr02.ttc.local

### Option: HostnameItem
#	Item used for generating Hostname if it is undefined.
#	Ignored if Hostname is defined.
#
# Mandatory: no
# Default:
# HostnameItem=system.hostname

### Option: ListenPort
#	Listen port for trapper.
#
# Mandatory: no
# Range: 1024-32767
# Default:
# ListenPort=10051

### Option: SourceIP
#	Source IP address for outgoing connections.
#
# Mandatory: no
# Default:
# SourceIP=

### Option: LogType
#	Specifies where log messages are written to:
#		system  - syslog
#		file    - file specified with LogFile parameter
#		console - standard output
#
# Mandatory: no
# Default:
# LogType=file

### Option: LogFile
#	Log file name for LogType 'file' parameter.
#
# Mandatory: yes, if LogType is set to file, otherwise no
# Default:
# LogFile=

LogFile=/var/log/zabbix/zabbix_proxy.log

### Option: LogFileSize
#	Maximum size of log file in MB.
#	0 - disable automatic log rotation.
#
# Mandatory: no
# Range: 0-1024
# Default:
# LogFileSize=1

LogFileSize=0

### Option: DebugLevel
#	Specifies debug level:
#	0 - basic information about starting and stopping of Zabbix processes
#	1 - critical information
#	2 - error information
#	3 - warnings
#	4 - for debugging (produces lots of information)
#	5 - extended debugging (produces even more information)
#
# Mandatory: no
# Range: 0-5
# Default:
# DebugLevel=3

### Option: EnableRemoteCommands
#		Whether remote commands from Zabbix server are allowed.
#		0 - not allowed
#		1 - allowed
#
# Mandatory: no
# Default:
# EnableRemoteCommands=0

### Option: LogRemoteCommands
#		Enable logging of executed shell commands as warnings.
#		0 - disabled
#		1 - enabled
#
# Mandatory: no
# Default:
# LogRemoteCommands=0

### Option: PidFile
#	Name of PID file.
#
# Mandatory: no
# Default:
# PidFile=/tmp/zabbix_proxy.pid

PidFile=/run/zabbix/zabbix_proxy.pid

### Option: SocketDir
#	IPC socket directory.
#		Directory to store IPC sockets used by internal Zabbix services.
#
# Mandatory: no
# Default:
# SocketDir=/tmp

SocketDir=/run/zabbix

### Option: DBHost
#	Database host name.
#	If set to localhost, socket is used for MySQL.
#	If set to empty string, socket is used for PostgreSQL.
#	If set to empty string, the Net Service Name connection method is used to connect to Oracle database; also see
#	the TNS_ADMIN environment variable to specify the directory where the tnsnames.ora file is located.
#
# Mandatory: no
# Default:
# DBHost=localhost

### Option: DBName
#	Database name.
#	For SQLite3 path to database file must be provided. DBUser and DBPassword are ignored.
#	If the Net Service Name connection method is used to connect to Oracle database, specify the service name from
#	the tnsnames.ora file or set to empty string; also see the TWO_TASK environment variable if DBName is set to
#	empty string.
#	Warning: do not attempt to use the same database Zabbix server is using.
#
# Mandatory: yes
# Default:
# DBName=

DBName=zabbix_proxy_db

### Option: DBSchema
#	Schema name. Used for PostgreSQL.
#
# Mandatory: no
# Default:
# DBSchema=

### Option: DBUser
#	Database user. Ignored for SQLite.
#
# Default:
# DBUser=

DBUser=zabbix_proxy_user

### Option: DBPassword
#	Database password. Ignored for SQLite.
#	Comment this line if no password is used.
#
# Mandatory: no
# Default:
DBPassword=zabbix_proxy_PWD

### Option: DBSocket
#	Path to MySQL socket.
#
# Mandatory: no
# Default:
# DBSocket=
... ... ...
After finishing, save and exit the configuration file.
Now, restart the Zabbix Proxy service to apply the changes:
sudo systemctl restart zabbix-proxy
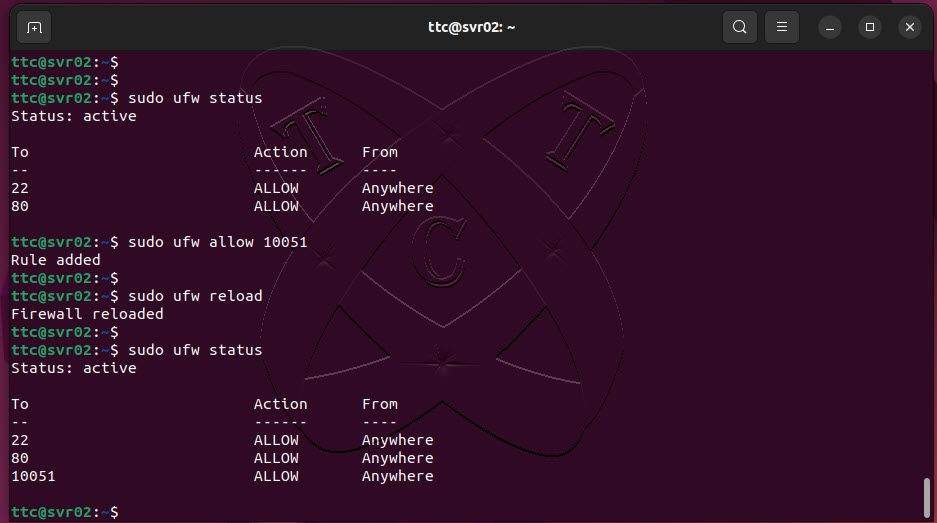
Step 7 – Configure Firewall
If your UFW firewall is active, you need to allow port 10051 through the firewall by executing the following commands:
sudo ufw status
sudo ufw allow 10051
sudo ufw reload
sudo ufw status
At this point, the configuration of the Zabbix Proxy server is complete.
Let’s move on to the Zabbix server to register the Zabbix Proxy server with the Zabbix server
On the Zabbix Server
Step 8 – Register the Proxy on the Zabbix Server
Access the Zabbix Server web interface and go to Administration – choose Proxies – select Create Proxy
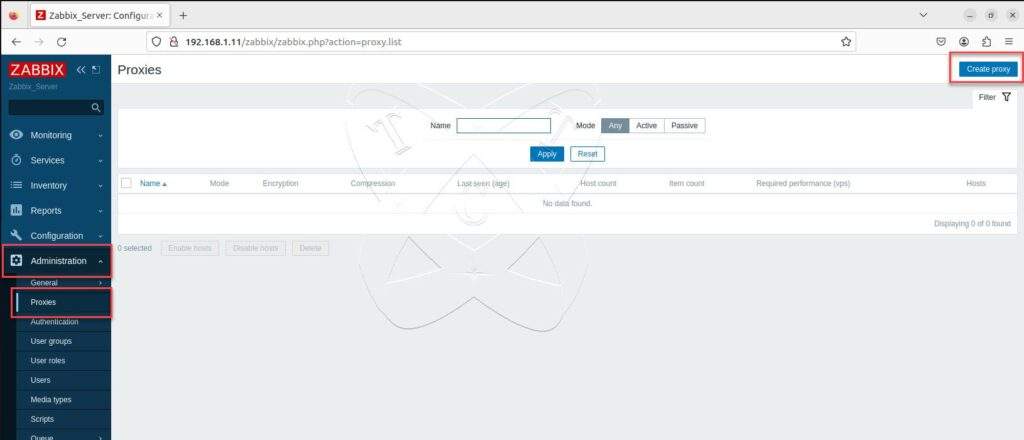
Declare the information for the Zabbix Proxy as follows:
Note: Select the correct Proxy mode corresponding to the configuration set up in step 6.
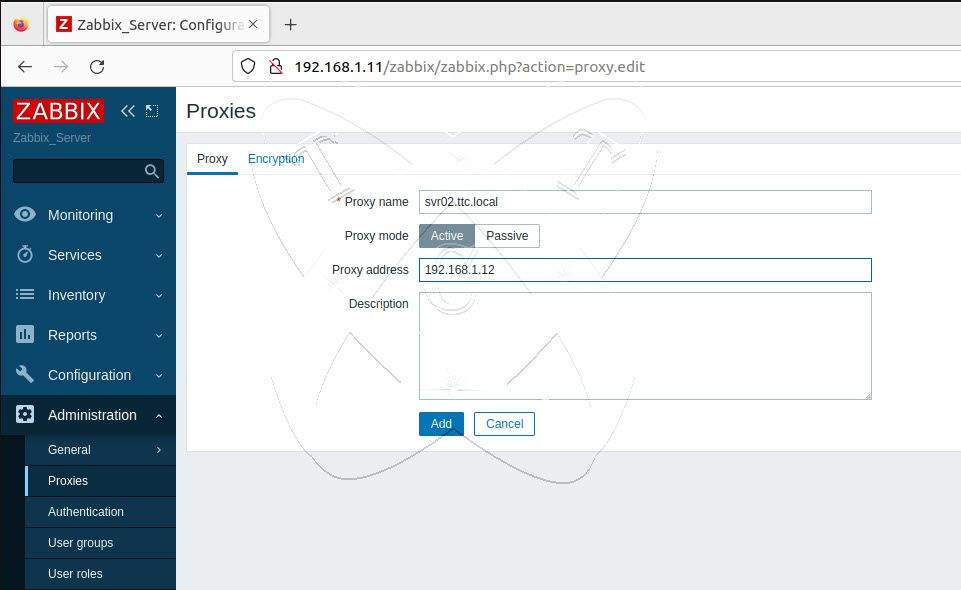
Once configured, click Add to add the Zabbix Proxy server.
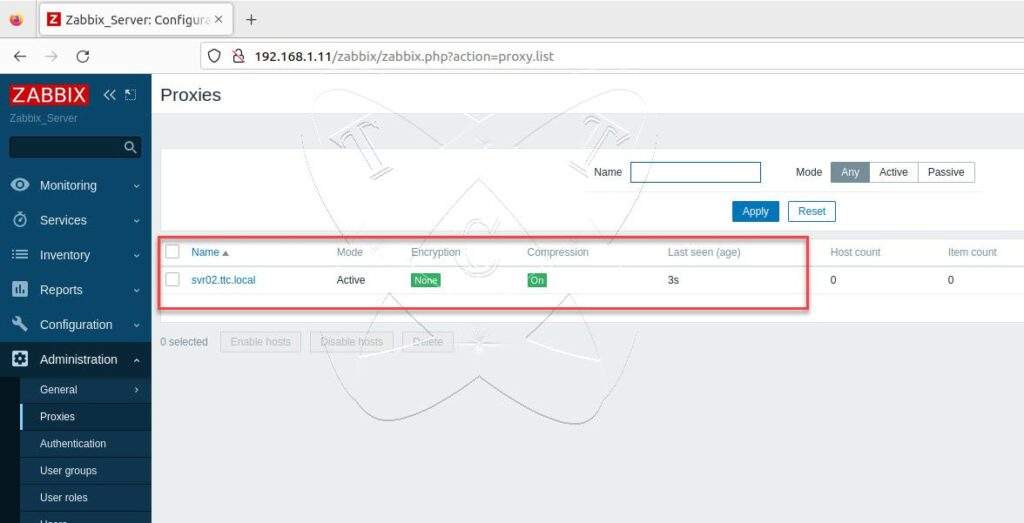
Wait for 5-10 minutes and then refresh the page. If the status of the Last seen (age) column displays in seconds, it means you have successfully configured it!
Conclusions
Through this guide, you’ve learned How to Install and Configure the Zabbix Proxy Server on Ubuntu/Debian. Zabbix Proxy is a vital tool for enhancing system monitoring capabilities, reducing load on the main server, and bolstering security. Hopefully, this tutorial has equipped you with the knowledge and skills to deploy Zabbix Proxy in your environment