Welcome to totatca.com. In this article, we will explore How to Monitor a Linux Host via SNMP v3 on Zabbix Server.
Monitoring your Linux hosts effectively is crucial for maintaining a robust and secure IT infrastructure. Simple Network Management Protocol version 3 (SNMP v3) offers enhanced security features, including authentication and encryption, making it an excellent choice for monitoring purposes.
In this guide, we will walk you through the process of setting up and configuring SNMP v3 on your Linux hosts, and integrating it with Zabbix Server. By the end of this tutorial, you will have a reliable monitoring setup that ensures your systems are continuously observed and any issues are promptly addressed.
Let’s get started on enhancing your monitoring capabilities with SNMP v3 and Zabbix Server.
Prerequisites
- User privileges: root or non-root user with sudo privileges
- Linux Host
- Ubuntu
- Debian
- Linux Mint
- Debian-based
Diagram
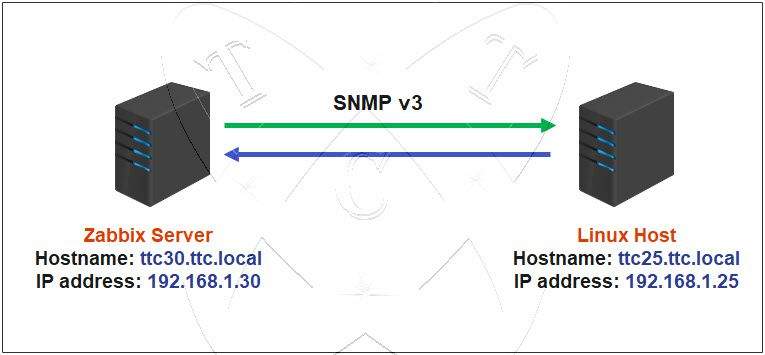
In which:
- Zabbix Server has been installed:
Read more: How to Install Zabbix Server on Ubuntu/Debian
or How to Install Zabbix Server on CentOS/RockyLinux/AlmaLinux- Hostname: ttc30.ttc.local
- IP Address: 192.168.1.30
- Linux Host:
- Hostname: ttc25.ttc.local
- IP Address: 192.168.1.25
On Linux Host
Step 1 – Install SNMP v3 on the Linux Host
On the Linux Host, open a Terminal window and run the following command to install SNMP v3:
sudo apt update
sudo apt install snmpd snmp libsnmp-dev -y
Once the installation is complete, execute the following commands to start the SNMP service and enable it to start on boot:
sudo systemctl start snmp
sudo systemctl enable snmp
Check the status of the SNMP service to ensure it is running on your system:
sudo systemctl status snmp
Step 2 – Configure SNMP on the Linux Host
Use the VIM text editor to open the SNMP configuration file with the following command:
sudo vim /etc/snmp/snmpd.conf
Edit some content as follows (lines highlighted)
###########################################################################
#
# snmpd.conf
# An example configuration file for configuring the Net-SNMP agent ('snmpd')
# See snmpd.conf(5) man page for details
#
###########################################################################
# SECTION: System Information Setup
#

# syslocation: The [typically physical] location of the system.
#   Note that setting this value here means that when trying to
#   perform an snmp SET operation to the sysLocation.0 variable will make
#   the agent return the "notWritable" error code.  IE, including
#   this token in the snmpd.conf file will disable write access to
#   the variable.
#   arguments:  location_string
sysLocation    IT Room
sysContact     [email protected]

# sysservices: The proper value for the sysServices object.
#   arguments:  sysservices_number
sysServices    72


###########################################################################
# SECTION: Agent Operating Mode
#
#   This section defines how the agent will operate when it
#   is running.

# master: Should the agent operate as a master agent or not.
#   Currently, the only supported master agent type for this token
#   is "agentx".
#
#   arguments: (on|yes|agentx|all|off|no)

master  agentx

# agentaddress: The IP address and port number that the agent will listen on.
#   By default the agent listens to any and all traffic from any
#   interface on the default SNMP port (161).  This allows you to
#   specify which address, interface, transport type and port(s) that you
#   want the agent to listen on.  Multiple definitions of this token
#   are concatenated together (using ':'s).
#   arguments: [transport:]port[@interface/address],...

#agentaddress  127.0.0.1,[::1]
#ADD NEW
agentAddress udp:161,udp6:[::1]:161


###########################################################################
# SECTION: Access Control Setup
#
#   This section defines who is allowed to talk to your running
#   snmp agent.

# Views
#   arguments viewname included [oid]

#  system + hrSystem groups only
view   systemonly  included   .1.3.6.1.2.1.1
view   systemonly  included   .1.3.6.1.2.1.25.1


# rocommunity: a SNMPv1/SNMPv2c read-only access community name
#   arguments:  community [default|hostname|network/bits] [oid | -V view]

# Read-only access to everyone to the systemonly view
rocommunity  public default -V systemonly
rocommunity6 public default -V systemonly

# SNMPv3 doesn't use communities, but users with (optionally) an
# authentication and encryption string. This user needs to be created
# with what they can view with rouser/rwuser lines in this file.
#
# createUser username (MD5|SHA|SHA-512|SHA-384|SHA-256|SHA-224) authpassphrase [DES|AES] [privpassphrase]
# e.g.
# createuser authPrivUser SHA-512 myauthphrase AES myprivphrase
#
# This should be put into /var/lib/snmp/snmpd.conf
#
# rouser: a SNMPv3 read-only access username
#    arguments: username [noauth|auth|priv [OID | -V VIEW [CONTEXT]]]
rouser authPrivUser authpriv -V systemonly

# include a all *.conf files in a directory
includeDir /etc/snmp/snmpd.conf.d
After you’re done, save and exit the configuration file.
Step 3 – Create an SNMP v3 User on the Linux Host
Before creating a user account for SNMP v3, we need to disable the SNMP daemon using the following command:
sudo systemctl stop snmp
Next, execute the following command to create an SNMP v3 account along with the corresponding password:
sudo net-snmp-config –create-snmpv3-user -ro -a SHA -A auth_Password -x AES -X privacy_Password snmpv3user
In which:
- ro: Defines read-only access permissions.
- auth_Password: Specifies the authentication password (Replace with your password)
- privacy_Password: Specifies the privacy password (Replace with your password)
- snmpv3user: The name of the SNMP v3 user to be created. (Replace with your account)
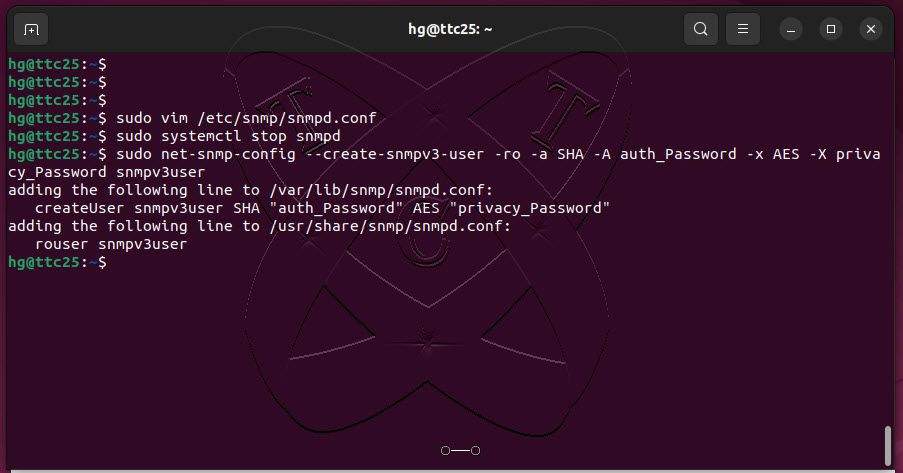
After creating the user, restart the SNMP service to apply the changes:
sudo systemctl restart snmp
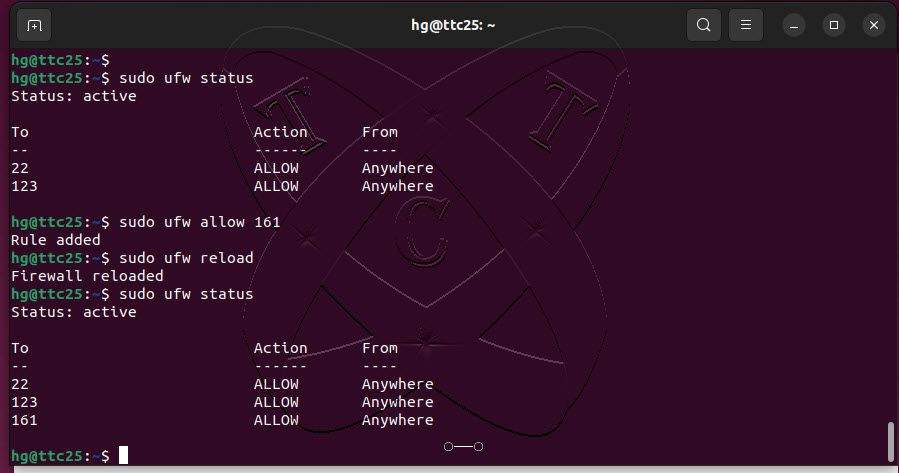
Step 4 – Configure Firewall
If the Linux Host is using the UFW firewall and it’s enabled, you need to allow port 161 through the firewall:
sudo ufw status
sudo ufw allow 161
sudo ufw reload
sudo ufw status
At this point, the installation and configuration on the Linux Host is complete. Now, let’s move on to the Zabbix Server.
On Zabbix Server
Step 5 – Install SNMP v3 on the Zabbix Server
To enable the Zabbix Server to communicate with the Linux Host via SNMP v3, you also need to install SNMP v3 on the Zabbix Server using the following command:
sudo apt install snmpd snmp libsnmp-dev -y
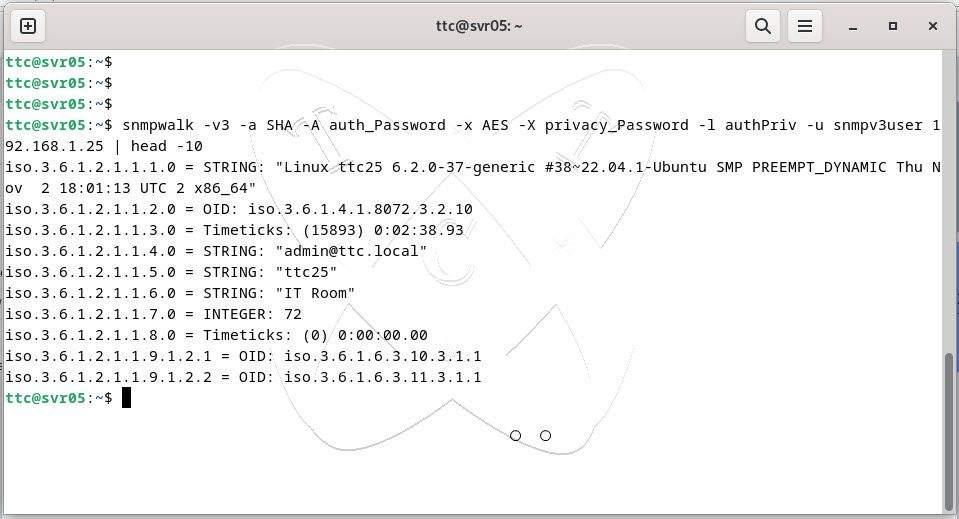
After the installation is complete, execute the following command to test the connection between the Zabbix Server and the Linux Host:
Note: Replace the authentication password, privacy password, authentication account (in step 3) and IP of the Linux Host
snmpwalk -v3 -a SHA -A auth_Password -x AES -X privacy_Password -l authPriv -u snmpv3user 192.168.1.25 | head -10
If the returned result is similar to the following, it means the connection is successful:
Step 6 – Add Linux Host using SNMP v3 on Zabbix Server
On the Dashboard page – select Configuration – select Create Host:
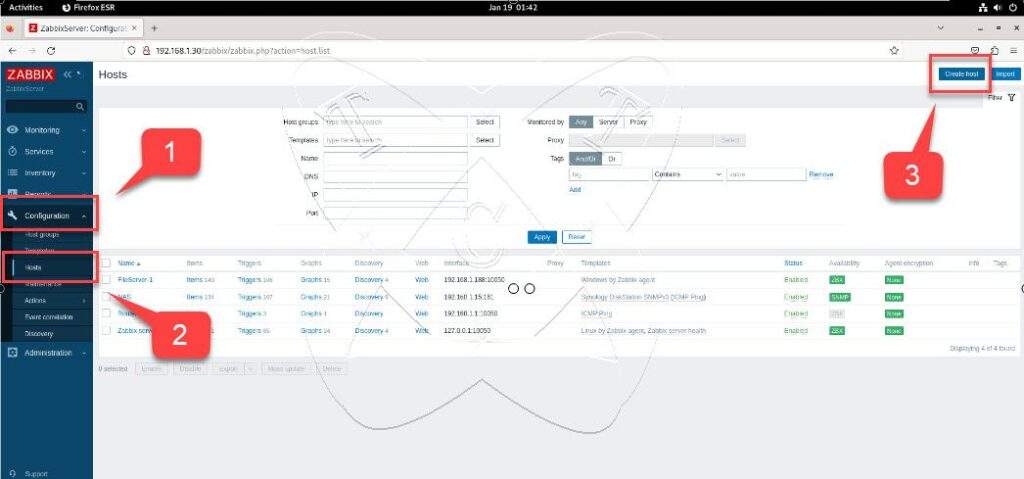
Set up the configuration of the Linux Host as shown in the image below:
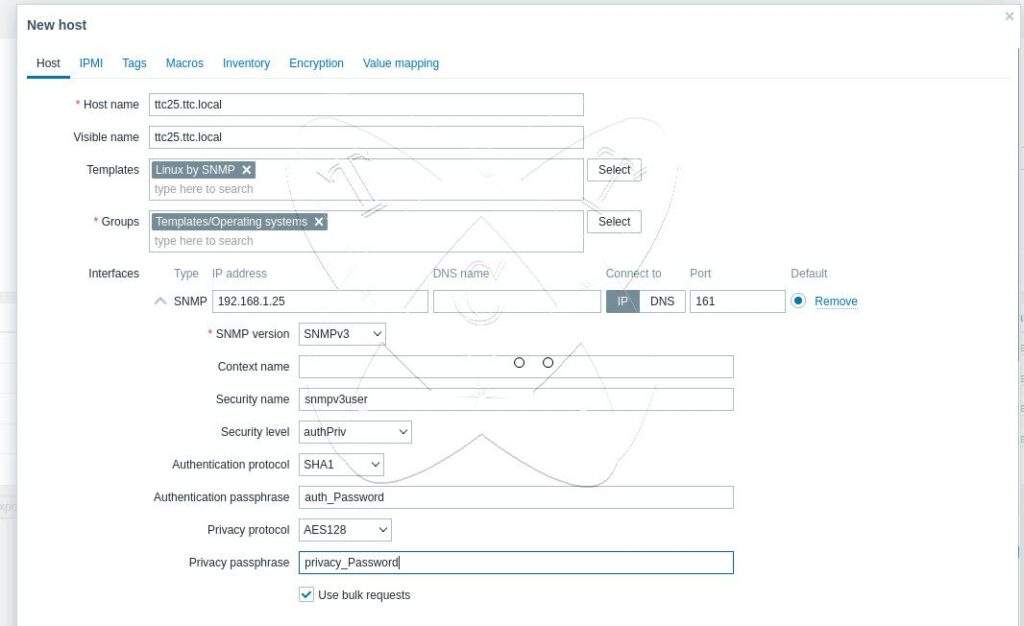
In which:
- Hostname: Hostname of Linux Host
- Templates: Linux by SNMP
- Groups: Templates/Operating systems
- Interfaces:
- SNMP: IP of Linux Host
- SMNP version: SNMP v3
- Security name: SNMP user account (created in step 3)
- Security level: authPriv
- Authentication protocol: SHA1
- Authentication passphrase: Authentication password (created in step 3)
- Privacy protocol: AES128
- Privacy passphrase: Privacy password (created in step 3)
Once configured, click Add to add the Linux Host.
Wait for 5-10 minutes, then refresh the page. If its status is green, it means the connection is successful:
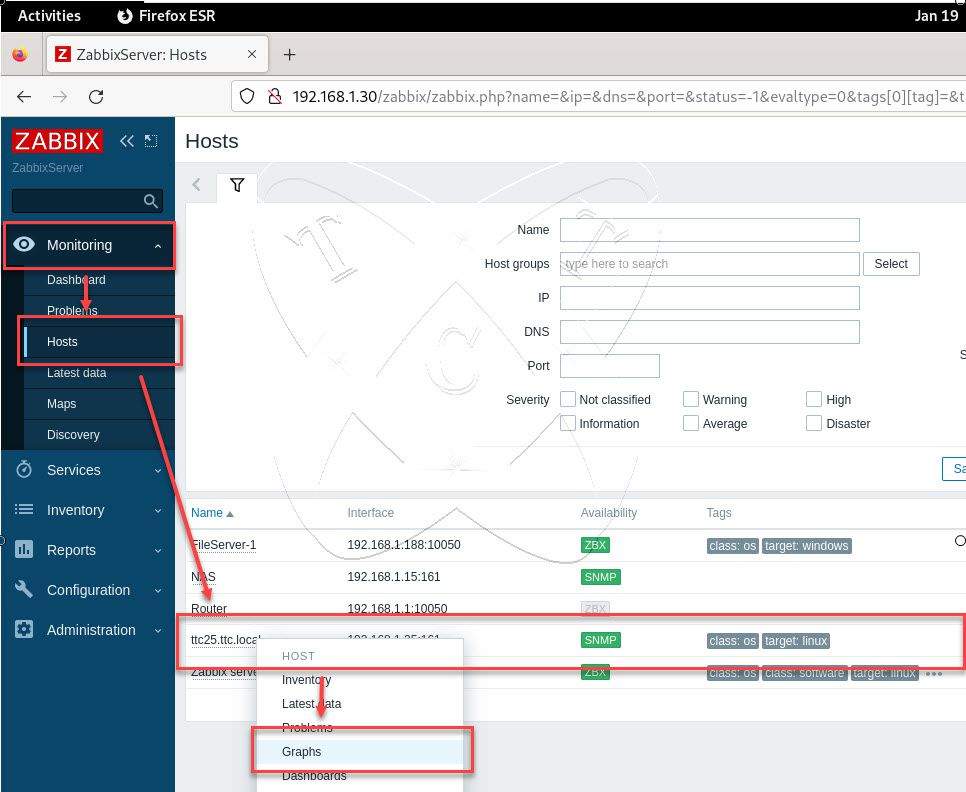
Step 7 – Monitor Linux Host via SNMP v3
On the Dashboard page – select Monitoring – select Hosts – click Linux Host – select Graph .
You will see that the Zabbix Server has monitored the monitoring chart as shown below:

Conclusions
Setting up SNMP v3 monitoring between a Linux Host and a Zabbix Server enhances the security and reliability of your monitoring system. By following the steps outlined in this guide, you can effectively monitor your Linux infrastructure using SNMP v3 and Zabbix, ensuring timely detection and resolution of any issues. Should you have any further questions or need assistance, feel free to reach out. Happy monitoring!
Video
How to Monitor Linux Host via SNMP v3 on Zabbix Server