This guide will walk you through the process of How to Install and Configure a Primary DNS server on the Ubuntu 22.04 LTS | 20.04 LTS | 18.04 LTS operating system. A primary DNS server is a critical component of the DNS system as it translates domain names into IP addresses, allowing devices on the network to access services and resources using domain names. By following this guide, you will learn how to set up a primary DNS server on Ubuntu, giving you the ability to control and manage domain name resolution within your local network.
In this tutorial, we will cover the step-by-step instructions for installing and configuring a primary DNS server using the BIND (Berkeley Internet Name Domain) software, a popular choice for DNS server deployment. You will learn how to install BIND, configure the main configuration file, and create the necessary DNS data files for your primary DNS server.
By the end of this guide, you will have a functioning primary DNS server on your Ubuntu system, empowering you to effectively manage domain name resolution within your network.
Let’s get started with detailed instructions on how to install and configure a primary DNS server on Ubuntu, so you can take control of your own DNS service
Prerequisites
- Operating system: An Ubuntu 22.04 LTS or 20.04 LTS or 18.04 LTS system
- The Ubuntu system has been configured with a static IP address
- User privileges: root or non-root user with sudo privileges
Read more
- How to Install LAMP (Linux – Apache – MySQL/MariaDB – PHP ) on Ubuntu 22/20/18 LTS
- Install and Configure Zabbix Server 6 LTS on Ubuntu 22/20/18 LTS
- How to Install Webmin on Ubuntu / Debian / Linux Mint
Diagram
Throughout this tutorial, assuming that we have a network diagram as shown below:
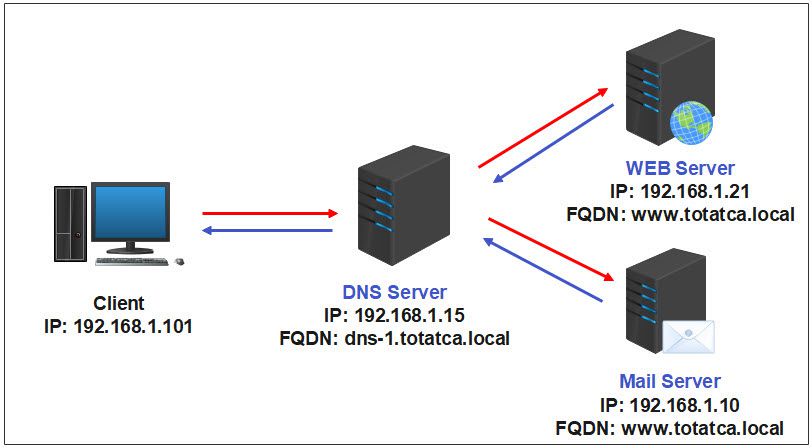
Within the network, there are the following servers:
- Network
- Domain: totatca.local
- Network: 192.168.1.0/24
- DNS Server
- IP Address: 192.168.1.15
- FQDN/Fullname: dns-1.totatca.local
- Web Server
- FQDN/Fullname: www.totatca.local
- IP Address: 192.168.1.21
- Mail Server
- FQDN/Fullname: mail.totatca.local
- IP Address: 192.168.1.10
- Windows Client
- IP Address: 192.168.1.100
- DNS: 192.168.1.15
Assuming that the Web server, Mail server, and other servers are ready and operational on the network system
Step 1 – Configure A Static IP Address for DNS Server
To configure a DNS Server, first, set up a static IP for your DNS server. A static IP address ensures that the server always has the same IP address when rebooted or during operation. This helps maintain the stability of the server and ensures that other devices on the network can consistently find and access the DNS server.
Read: How to Configure Static IP Address on Ubuntu Server
Step 2 – Configure FQDN/Full-name on DNS Server
The next step is to set up the Fully Qualified Domain Name (FQDN) for the DNS server. FQDN is a unique identifier for the server on the network and is used to identify the server within the DNS system.
Configuring the FQDN involves naming the server and its corresponding domain. This helps in determining the IP address of the server when queried through DNS.
Read: How to Change Hostname and FQDN/Fullname on Linux
Step 3 – Install Primary DNS Server on Ubuntu
Before starting the installation, ensure that your system is up to date. Use the following command to update it:
sudo apt update && sudo apt upgrade -y
Installing bind9 is one of the first thing you need to do in order to create your own DNS server. Run the following command to install bind9 and its dependencies
sudo apt install bind9 bind9utils bind9-doc -y
Among which:
- bind9 – The BIND 9 DNS server software.
- bind9utils – Utilities that make working with BIND 9 easier.
- bind9-doc – A documentation package for BIND 9.
Step 4 – Configure Primary DNS Server on Ubuntu
BIND9 has been installed, go to the directory /etc/bind9. This directory serves as the storage location for BIND9 configuration files.
cd /etc/bind
ls
You will find the default configuration files for BIND9 as follows:
- named.conf: The main configuration file for BIND9, which contains global settings and references to other configuration files.
- named.conf.options: This file includes options for the BIND9 server, such as listening interfaces, query forwarding, and logging settings.
- named.conf.local: This file is used to define local zones and zone-specific configuration settings.
- named.conf.default-zones: It includes pre-configured zones for localhost and reverse DNS lookup.
- db.local: This is the zone file for the localhost domain.
- db.127: This is the zone file for the reverse DNS lookup of the loopback address (127.0.0.1)

Edit named.conf.options file
Using the vim text editor, open the named.conf.options file with the command below
sudo vim named.conf.options
Delete the entire content of the file by pressing the Esc key to enter command mode, type :1,$d and hit Enter
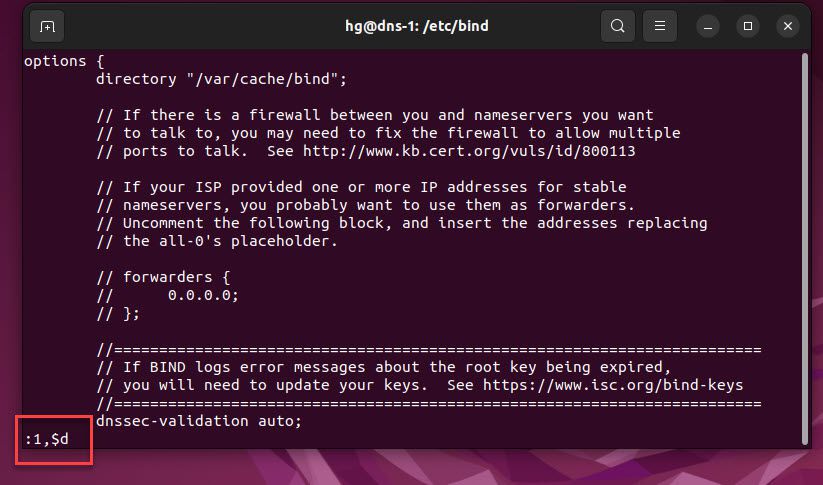
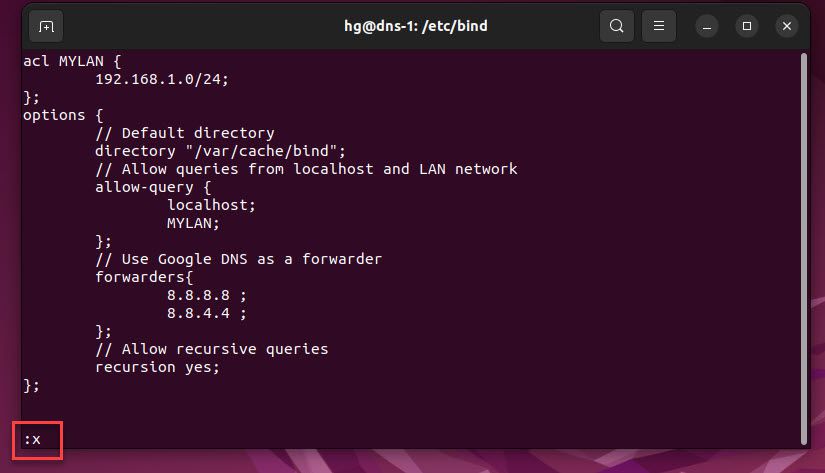
After that, press the i key to switch to insert mode, and then add the content below:
// Define LAN network
acl MYLAN {
	192.168.1.0/24;
};
options {
	// Default directory
	directory "/var/cache/bind";
	// Allow queries from localhost and LAN network
	allow-query {
		localhost;
		MYLAN;
	};
	// Use Google DNS as a forwarder
	forwarders{
		8.8.8.8 ;
		8.8.4.4 ;
	};
	// Allow recursive queries
	recursion yes;
};
Save and exit the file by pressing ESC and type the command :x then hit Enter
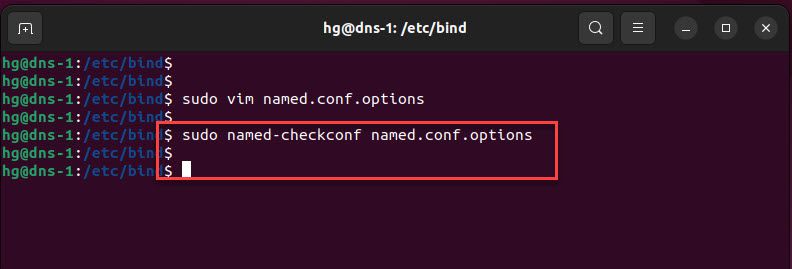
Next, run the command following below to check the syntax errors.
sudo named-checkconf named.conf.options
If the command doesn’t display any error messages, it indicates that the configuration file has been written correctly and is ready to be used.
Edit named.conf.local file
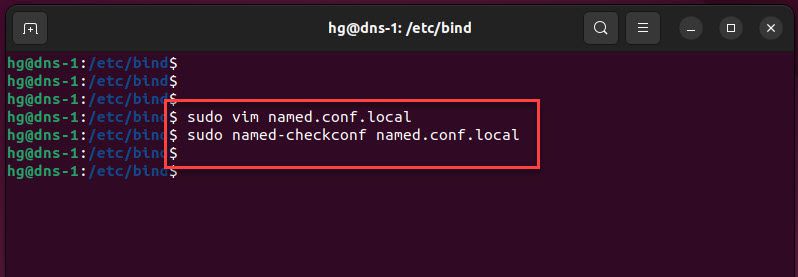
Open the named.conf.local file with the command below:
sudo vim named.conf.local
Add the content below to the file.
// Define the Forward zone
// My domain: totatca.local
// Forward file called fwd.totatca.local
zone "totatca.local" IN {
	type master;
	// Path of Forward file [ Step 5 ]
	file "/etc/bind/totatca/fwd.totatca.local";
};
// Define the Reverse zone
// Reverse file called: rvs.totatca.local
zone "1.168.192.in-addr.arpa" IN {
        type master;
        // Path of Reverse file [ Step 5 ]
        file "/etc/bind/totatca/rvs.totatca.local";
};
Save and exit the file.
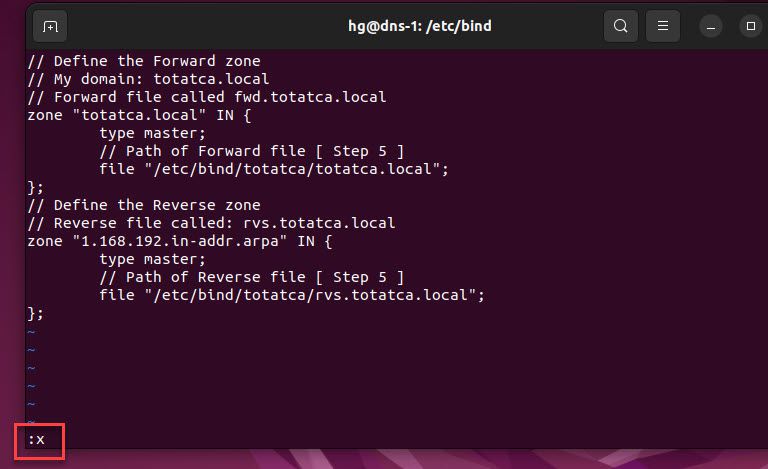
Next, run the command following below to check the syntax errors.
sudo named-checkconf named.conf.local
If the command doesn’t display any error messages, it indicates that the configuration file has been written correctly and is ready to be used.
Step 5 – Configure Zones
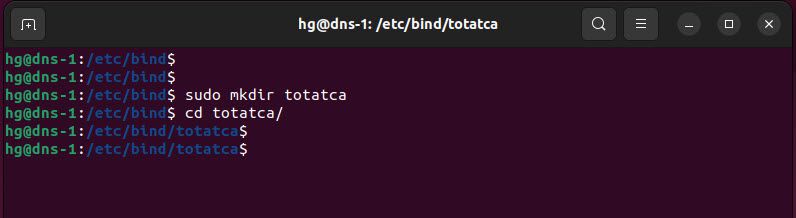
In step 4, we declared the Forward (fwd.totatca.local) and Reverse (rvs.totatca.local) files in the /etc/bind/totatca directory. Therefore, to proceed, we need to create a directory named totatca in the /etc/bind/ path to store these files using the following command:
sudo mkdir totatca
cd totatca
Create the Forward Zone file
The Forward Zone in DNS is used to map domain names to IP addresses. It allows the DNS server to understand the corresponding IP address for each requested domain name.
For example, in the Forward Zone, we have a DNS record for the domain name www.totatca.local mapped to the IP address 192.168.1.21. When a computer requests the IP address of www.totatca.local, the DNS server will return the IP address 192.168.1.21, enabling the computer to connect to the correct destination at www.totatca.local.
Now, create a new file named fwd.totatca.local for the Forward Zone using the following command:
sudo vim fwd.totatca.local
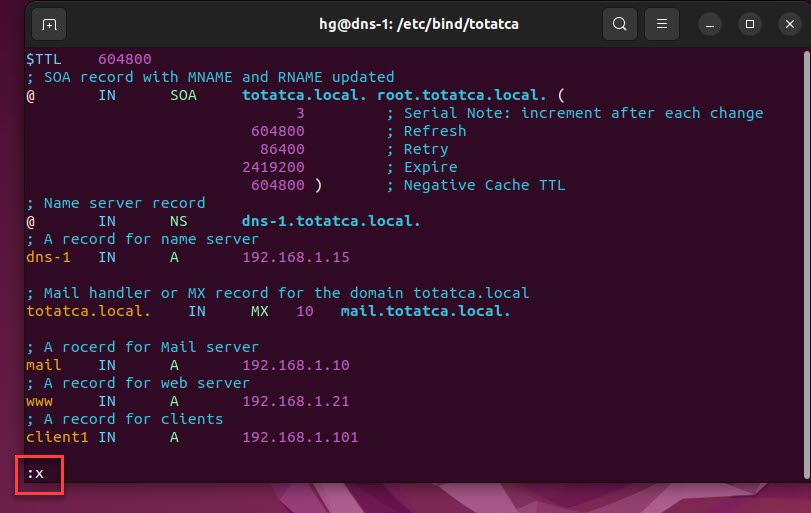
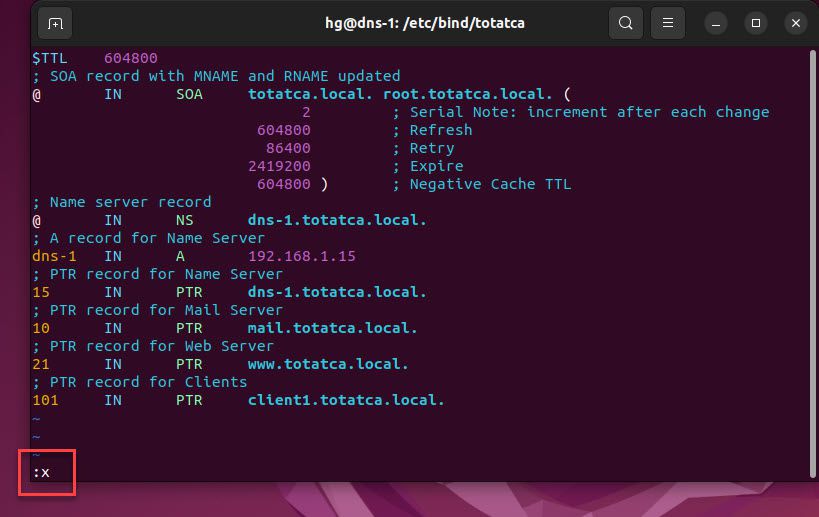
Add the content below to the file:
$TTL    604800
; SOA record with MNAME and RNAME updated
@       IN      SOA     totatca.local. root.totatca.local. (
                              3         ; Serial Note: increment after each change
                         604800         ; Refresh
                          86400         ; Retry
                        2419200         ; Expire
                         604800 )       ; Negative Cache TTL
; Name server record
@       IN      NS      dns-1.totatca.local.
; A record for name server
dns-1   IN      A       192.168.1.15

; Mail handler or MX record for the domain totatca.local
totatca.local.    IN     MX   10   mail.totatca.local.

; A rocerd for Mail server
mail    IN      A       192.168.1.10
; A record for web server
www     IN      A       192.168.1.21
; A record for clients
client1 IN      A       192.168.1.101
Save and exit the file
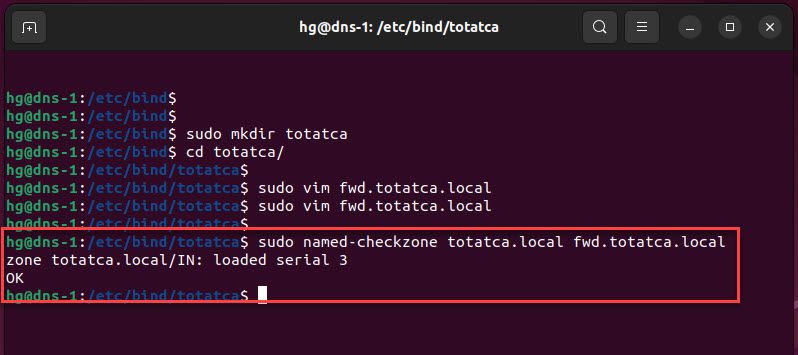
Next, run the command following below to check the syntax errors:
sudo named-checkzone totatca.local fwd.totatca.local
If there are no syntax errors, the result will be returned as OK as shown below:
Create the Reverse Zone file
Reverse Zone in DNS is used to map IP addresses to domain names. It allows the DNS server to know the corresponding domain name for each IP address.
In the DNS system, domain names are used to identify network resources, while IP addresses determine the location of devices on the network. Reverse Zone provides a way to perform reverse mapping, going from an IP address back to a domain name.
For example, in the Reverse Zone, there may be a DNS record mapping the IP address 192.168.1.21 to the domain name www.totatca.local. When a computer sends a request with the IP address 192.168.1.21, the DNS server will return the domain name www.totatca.local, indicating that the IP address is associated with the corresponding domain name.
Now, create a new file named rvs.totatca.local for the Reverse Zone using the following command:
sudo vim rvs.totatca.local
Add the content below to the file:
$TTL    604800
; SOA record with MNAME and RNAME updated
@       IN      SOA     totatca.local. root.totatca.local. (
                              2         ; Serial Note: increment after each change
                         604800         ; Refresh
                          86400         ; Retry
                        2419200         ; Expire
                         604800 )       ; Negative Cache TTL
; Name server record
@       IN      NS      dns-1.totatca.local.
; A record for Name Server
dns-1   IN      A       192.168.1.15
; PTR record for Name Server
15      IN      PTR     dns-1.totatca.local.
; PTR record for Mail Server
10      IN      PTR     mail.totatca.local.
; PTR record for Web Server
21      IN      PTR     www.totatca.local.
; PTR record for Clients
101     IN      PTR     client1.totatca.local.
Save and exit the file
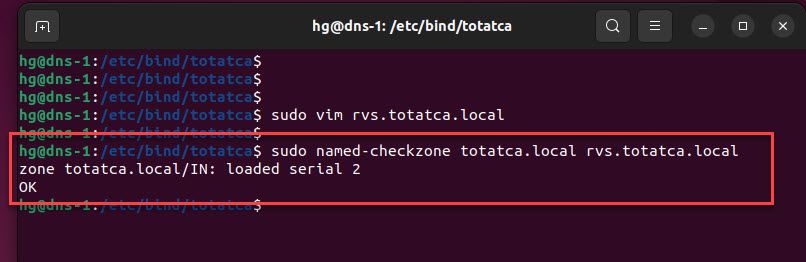
Next, run the command following below to check the syntax errors:
sudo named-checkzone totatca.local rvs.totatca.local
If there are no syntax errors, the result will be returned as OK as shown below:
Now, restart the BIND9 service to apply the changes by running the following command:
sudo systemctl restart bind9
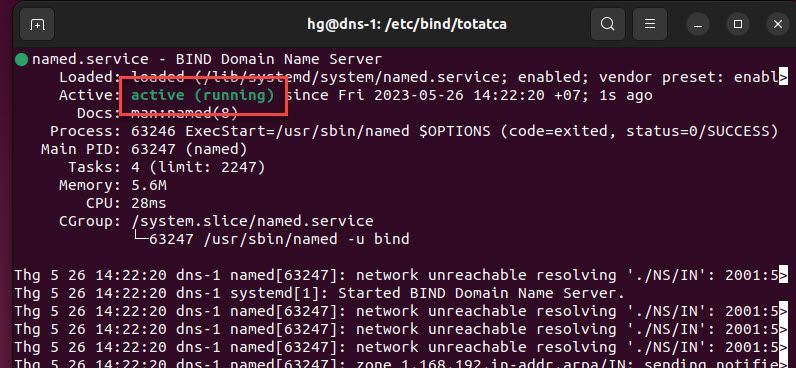
And don’t forget to check the status of the BIND9 service using the command below:
sudo systemctl status bind9
If it is running, the status will be Active, as shown below:
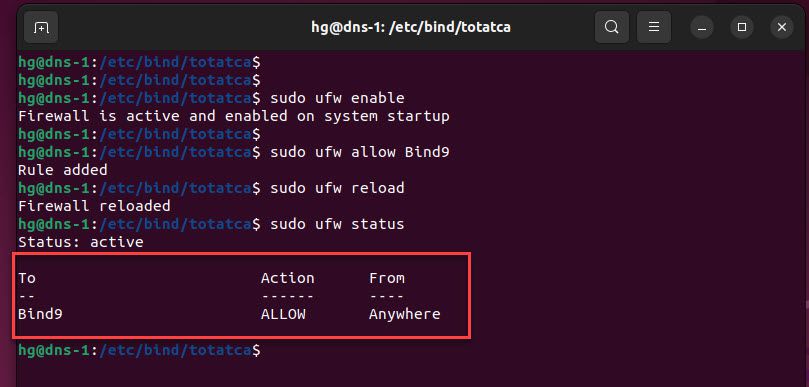
Step 6 – Adjust Firewall
If you have UFW enabled on your system, you need to open access to BIND by running the following command:
Note: Skip this step, if you don’t want to the UFW firewall running on your system
sudo ufw enable
sudo ufw allow Bind9
sudo ufw reload
sudo ufw status
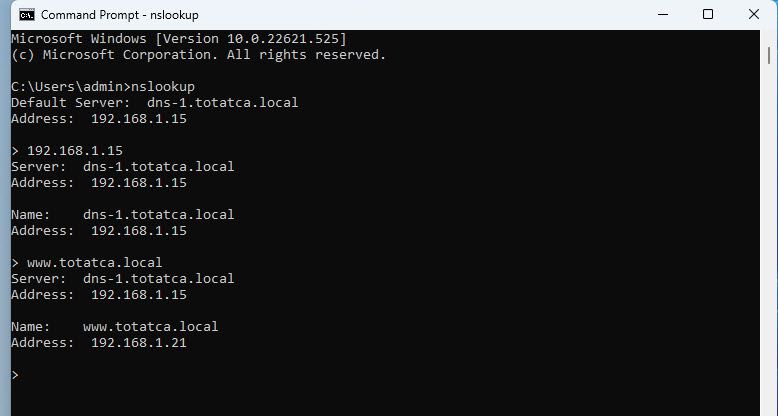
Step 7 – Testing
On Windows, to check whether the DNS server is functioning correctly, first configure the DNS to point to the IP address of the DNS server as shown below:

Next, open the Command Prompt and you can use the following commands:
nslookup
192.168.1.15
www.totatca.local
When you run this commands, you will enter DNS queries such as domain names, and the command will return the results from the DNS server. If you receive accurate and valid results, it means that the DNS server is functioning correctly.
That’s it! With this How to Install and Configure Primary DNS Server on Ubuntu, you can now create your own DNS server. If you have any questions or suggestions, please feel free to leave a comment below.
Thank you for reading !!!