Hello everyone, in this article, we will explore how to Install and Configure a MariaDB Server on an Ubuntu system together.
What is MariaDB
MariaDB is a powerful open-source database management system built upon the foundation of MySQL. Focused on performance, reliability, and security, MariaDB has quickly become a popular choice for organizations and developers worldwide.
Features
- Open Source: MariaDB is an open-source project, that allows users to use, modify, and distribute the source code freely. This fosters a vibrant and passionate community around the system.
- Compatibility with MySQL: Retaining the strength and compatibility with MySQL, MariaDB ensures that applications and tools developed for MySQL can seamlessly run on its platform.
- Excellent Performance: MariaDB is optimized to provide high performance, enabling quick and efficient processing of large data loads and queries.
- Scalability and Data Partitioning: Supporting sharding, replication, and clustering, MariaDB allows users to easily scale their systems while keeping data organized and manageable.
- Security and Safety: MariaDB offers security features such as data encryption, access control, and authentication, safeguarding your critical data from threats.
- Community Support: With a large and active user and developer community, MariaDB is not just a tool but also a community where you can learn, share ideas, and receive support when needed.
MariaDB is the perfect blend of flexibility, performance, and security, making it a superior choice for any applications and projects seeking a robust and reliable database management system.
Read more
- How to Install and Configure OpenVPN Server on Ubuntu
- How to Show Line Numbers in VI/VIM Text Editor
- How to Install and Configure Nagios Core Server on Ubuntu/Debian/Linux Mint
- How to Install and Configure NextCloud Server on Ubuntu
- How to Install and Configure RocketChat Server on Ubuntu 22.04 | 20.04 LTS
Prerequisites
- Operating system: A Ubuntu server ( Ubuntu Desktop or Ubuntu Server)
- User privileges: root or non-root user with sudo privileges.
Step-by-step Install and Configure MariaDB Server
Step 1 – Install MariaDB Server
First, open the terminal on Ubuntu and update the package list:
sudo apt update
Then, install MariaDB with the following command:
sudo apt install mariadb-server mariadb-client -y
Once the installation process is complete, start and enable the MySQL service to automatically start with the system every time it restarts using the following command:
sudo systemctl start mariadb
sudo systemctl enable mariadb
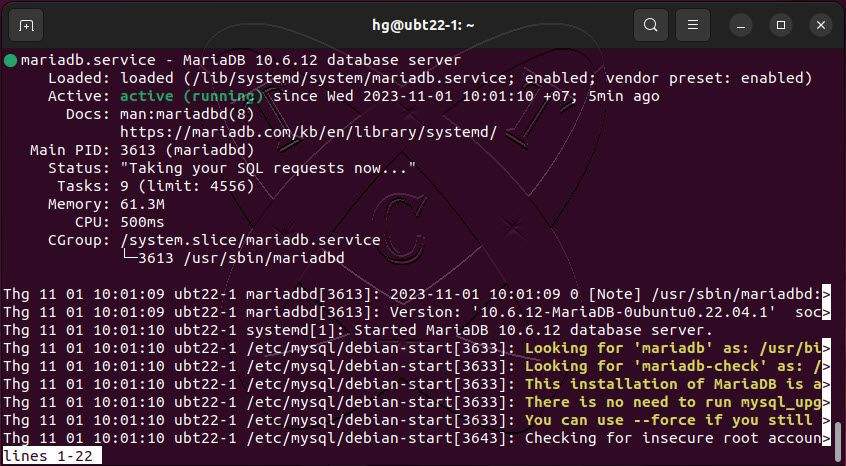
Check the status of the MySQL service to ensure that it is running on your system using the following command:
sudo systemctl status mariadb
You will see the status of MariaDB is currently running as shown below:
Step 2 – Configure Secure MariaDB Server
MariaDB is installed with a root account without a password. To secure the MariaDB server, you should run the following command to set a password for the root account:
sudo mysql_secure_installation
You will be prompted to set a password for the MariaDB root user, and delete test users, and unsafe databases as shown below:
hg@ubt22-1:~$ sudo mysql_secure_installation

NOTE: RUNNING ALL PARTS OF THIS SCRIPT IS RECOMMENDED FOR ALL MariaDB
      SERVERS IN PRODUCTION USE!  PLEASE READ EACH STEP CAREFULLY!

In order to log into MariaDB to secure it, we'll need the current
password for the root user. If you've just installed MariaDB, and
haven't set the root password yet, you should just press enter here.

Enter current password for root (enter for none):    <== hit Enter
OK, successfully used password, moving on...

Setting the root password or using the unix_socket ensures that nobody
can log into the MariaDB root user without the proper authorisation.

You already have your root account protected, so you can safely answer 'n'.

Switch to unix_socket authentication [Y/n]    <== hit Enter
Enabled successfully!
Reloading privilege tables..
 ... Success!


You already have your root account protected, so you can safely answer 'n'.

Change the root password? [Y/n]    <== hit Enter
New password:                  <== Enter Your-Password
Re-enter new password:         <== Enter Your-Password
Password updated successfully!
Reloading privilege tables..
 ... Success!


By default, a MariaDB installation has an anonymous user, allowing anyone
to log into MariaDB without having to have a user account created for
them.  This is intended only for testing, and to make the installation
go a bit smoother.  You should remove them before moving into a
production environment.

Remove anonymous users? [Y/n]    <== hit Enter
 ... Success!

Normally, root should only be allowed to connect from 'localhost'.  This
ensures that someone cannot guess at the root password from the network.

Disallow root login remotely? [Y/n]    <== hit Enter
 ... Success!

By default, MariaDB comes with a database named 'test' that anyone can
access.  This is also intended only for testing, and should be removed
before moving into a production environment.

Remove test database and access to it? [Y/n]    <== hit Enter
 - Dropping test database...
 ... Success!
 - Removing privileges on test database...
 ... Success!

Reloading the privilege tables will ensure that all changes made so far
will take effect immediately.

Reload privilege tables now? [Y/n]   <== hit Enter
 ... Success!

Cleaning up...

All done!  If you've completed all of the above steps, your MariaDB
installation should now be secure.

Thanks for using MariaDB!
hg@ubt22-1:~$
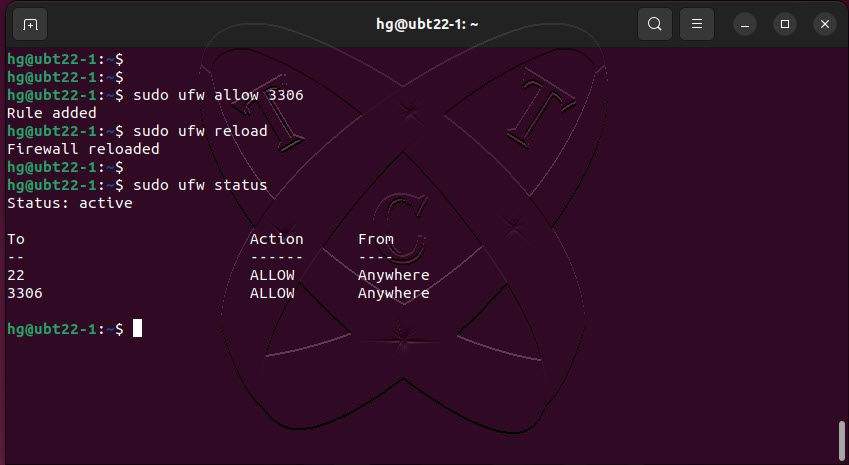
Step 3 – Adjust Firewall
If you are using the UFW firewall on your system and need to access the MariaDB server remotely, you need to allow port 3306 through the firewall using the following command:
Read more: How to Configure UFW Firewall on Linux Ubuntu | Debian | LinuxMint
Note: Skip this step if you are not using a firewall on your system.
sudo ufw allow 3306
sudo ufw reload
sudo ufw status
Conclusion
In this tutorial, we’ve explored how to install and configure MariaDB on Ubuntu, creating a robust and secure database environment. This knowledge is essential not only for system administrators but also for web developers aiming to build reliable applications. By using MariaDB, we can develop high-performance web applications with dependable stability.
Thank you for reading !!!