Setting up a firewall is paramount to ensuring the security of your Linux server. Uncomplicated Firewall (UFW) provides a simplified way to establish robust firewall rules, protecting your system from unauthorized access and potential threats. In this comprehensive guide, we’ll walk you through the detailed steps of configuring UFW on your Debian-based Linux server.
Read more
- How to Set Up Basic Records for a Mail Server
- How to Install and Configure OpenVPN Server on Ubuntu
- How to Install and Configure LAMP Stack on Ubuntu 23
- How to Install LEMP stack on Ubuntu 22.04 | 20.04 | 18.04 LTS
- Install and Configure Zabbix Server 6 LTS on Ubuntu 22/20/18 LTS
Prerequisites
- Operating system:
- Ubuntu
- Debian
- Linux Mint
- Debian-based
- User privileges: root or non-root user with sudo privileges.
Step 1 – Install UFW Firewall
If UFW is not installed, update the package list on your server and install UFW using the following commands:
sudo apt update
sudo apt install ufw -y
After successful installation, activate the UFW firewall using the following command:
sudo ufw enable
Or in case you want to disable the UFW firewall, run the following command:
sudo ufw disable
To check the status of the UFW firewall, run the following command:
sudo ufw status
Whenever you add, modify, or delete rules, run the following command to refresh the firewall:
sudo ufw reload
Step 2 – Default Policies
By default, UFW is configured to deny all incoming connections and allow all outgoing connections. This means no incoming connections are allowed to the server, but it will permit the server to access all services outside.
To set the UFW firewall to the default configuration as described above, use the following commands:
sudo ufw default deny incoming
sudo ufw default allow outgoing
Step 3 – Allow Rules
Allowing SSH Access
SSH is crucial for server administration, enabling remote management. As outlined in Step 2, the UFW firewall, by default, blocks all connections to the server. Therefore, without allowing SSH, you won’t be able to manage your server remotely.
To enable SSH connections, execute the following command:
sudo ufw allow ssh
Allowing Other Services
Depending on the specific purpose of each server, different rules may apply. To ensure your server functions properly, allow all services that your server is using through the UFW firewall using either of the following syntaxes:
- Use the service’s port:
sudo ufw allow Port_of_Service
- Use the service’s name:
sudo ufw allow Name_of_Service
For example, if your web server is using the HTTP service with the default port 80, you can allow the HTTP service using either of the following commands:
sudo ufw allow 80
OR
sudo ufw allow http
Allow Multiple Ports
In some cases, if you need to allow specific ports through the UFW firewall, execute the command in the following syntax:
sudo ufw allow [Port_Number_1, Port_Number_2, … ]
For example, I will allow the ports of the Mail Server service, including ports 25 (SMTP), 465 (SMTPS), and 587 (Secure SMTP) through the UFW firewall using the following command:
sudo ufw allow 25,465,587
Allowing Port Ranges
For services that do not use a single port but use a range of consecutive ports, you can use the following syntax to accomplish this:
sudo ufw allow Start_port:End_port
For example, a certain service needs to use ports 5000, 5001, 5002, 5003,…5010. To allow it through the firewall, let’s execute the following command:
sudo ufw allow 5000:5010
Note: that they must be consecutive numbers without gaps.
Allowing an IP Address
Sometimes, we need to secure the server absolutely by allowing only a specific IP address to connect to our server. To do that, execute the command in the following syntax:
sudo ufw allow from IP_Address
For example, I have a server and only allow devices with the source address 111.111.111.111 to access my server. Let’s execute the following command:
sudo ufw allow from 111.111.111.111
You can also specify which specific services that IP address is allowed to access using the following syntax:
sudo ufw allow IP_Address to any port Port_Number
In the same example, but I only allow the IP address 111.111.111.111 to access the HTTP service (port 80):
sudo ufw allow from 111.111.111.111 to any port 80
Allow Specific Subnets
To apply on a broader range, you can also allow a specific subnet to access the server using the following syntax:
sudo ufw allow from Subnet
For example, the network system consists of two subnets: 10.20.10.0/24 and 10.20.11.0/24. My server is located in the 10.20.10.0/24 subnet, and I only allow the 10.20.10.0/24 subnet to access:
sudo ufw allow from 10.20.10.0/24
Similar to applying with specific IP addresses, you can also specify a subnet to only access the server through a certain port using the following syntax:
sudo ufw allow from Subnet to any port Port_Number
Similar to the previous example, but I will allow the subnet 10.20.11.0/24 to only access the HTTP service (port 80):
sudo ufw allow from 10.20.11.0/24 to any port 80
Step 4 – Deny Rules
Similar to the allow rules presented in Step 3, to deny connections, replace allow with deny in the command syntax.
For example, we execute the following two commands:
sudo ufw allow from 10.20.10.0/24
sudo ufw deny from 10.20.10.0/24 to any port 22
When we execute the command sudo ufw allow from 10.20.10.0/24 first, we are allowing all connections from the IP addresses within the range 10.20.10.0/24. Subsequently, when we execute the command sudo ufw deny from 10.20.10.0/24 to any port 22, we are setting a rule to deny all connections to port 22 from IP addresses in the 10.20.10.0/24 range.
Because we established the allow rule first, the deny rule added afterward takes precedence. This means that any connection attempts to port 22 from IP addresses within the 10.20.10.0/24 range will be denied, regardless of the previously set allow rule.
In this situation, executing the commands in a specific order is crucial to ensure that the rules are applied correctly and create a sensible security environment on our server
Step 5 – Delete Rules
In this step, you will remove specific rules from the firewall configuration. Deleting rules can be necessary to update security settings or modify access permissions. To delete a rule, use the following syntax:
sudo ufw delete [rule_number]
Replace [rule_number] with the number corresponding to the rule you want to delete. Ensure you have identified the correct rule number before executing the command to avoid unintended changes in your firewall configuration.
So how do you know the [rule_number]? The simplest way is to use the following command:
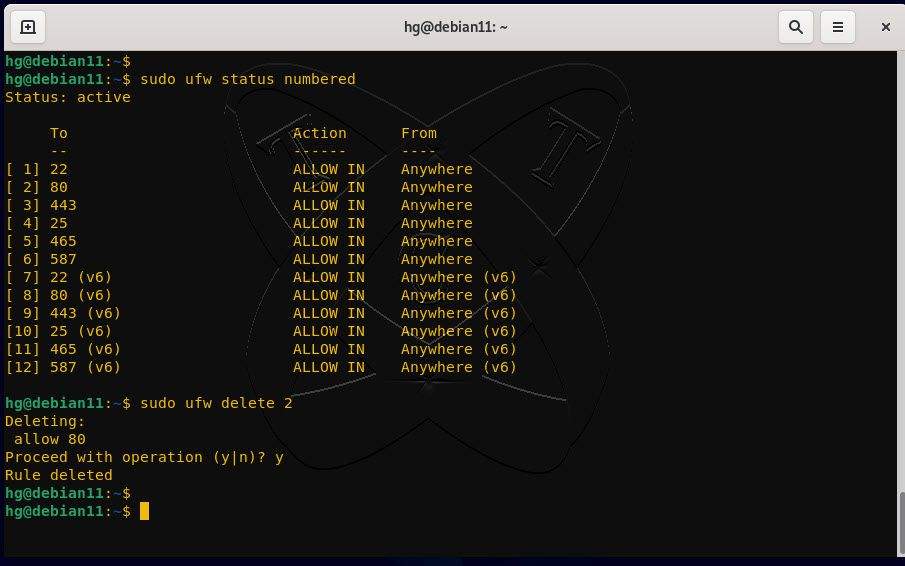
sudo ufw status numbered
You will see the order of rules displayed as follows:
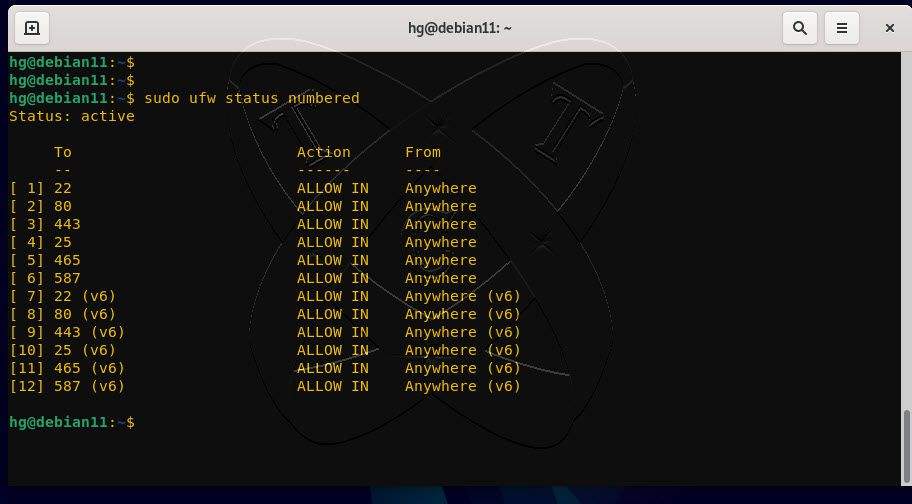
For example, as shown in the figure above, if we want to delete the rule allowing connections to port 80 with the rule number 2, we will execute the following command:
sudo ufw delete 2
Conclusion
By following these steps, you’ve successfully set up a firewall using UFW on your Linux server. Regularly review your firewall rules to adapt to changing security needs. A well-configured firewall is a fundamental component of your server’s security strategy, safeguarding it against unauthorized access and potential threats. Stay secure and keep your server protected!