The pfSense project is a free network firewall distribution, based on the FreeBSD operating system with a custom kernel and including third party free software packages for additional functionality. pfSense software, with the help of the package system, is able to provide the same functionality or more of common commercial firewalls, without any of the artificial limitations. It has successfully replaced every big name commercial firewall you can imagine in numerous installations around the world, including Check Point, Cisco PIX, Cisco ASA, Juniper, Sonicwall, Netgear, Watchguard, Astaro, and more.
pfSense software includes a web interface for the configuration of all included components. There is no need for any UNIX knowledge, no need to use the command line for anything, and no need to ever manually edit any rule sets. Users familiar with commercial firewalls catch on to the web interface quickly, though there can be a learning curve for users not familiar with commercial-grade firewalls.
In this tutorial, we will step-by-step learn How to Install and Configure pfSense Firewall on VMware Workstation
Prerequisites
- VMware Workstation has been installed
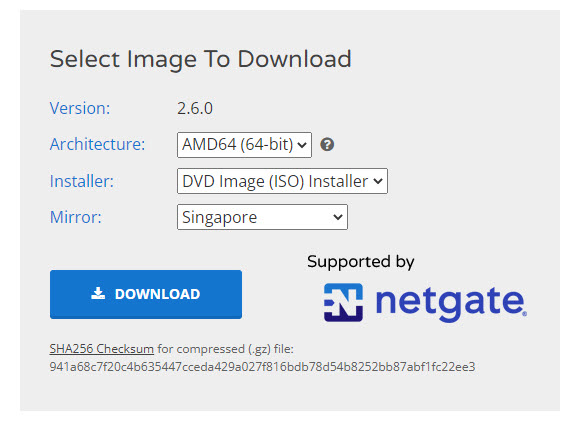
- Download the pfSense ISO image from the official website here and select as shown below:
- Architecture: AMD64 (64-bit)
- Installer: DVD image (ISO) installer
- Mirror: Select the server nearest to you.
Diagram
Let’s assume that we have a network diagram as shown below:
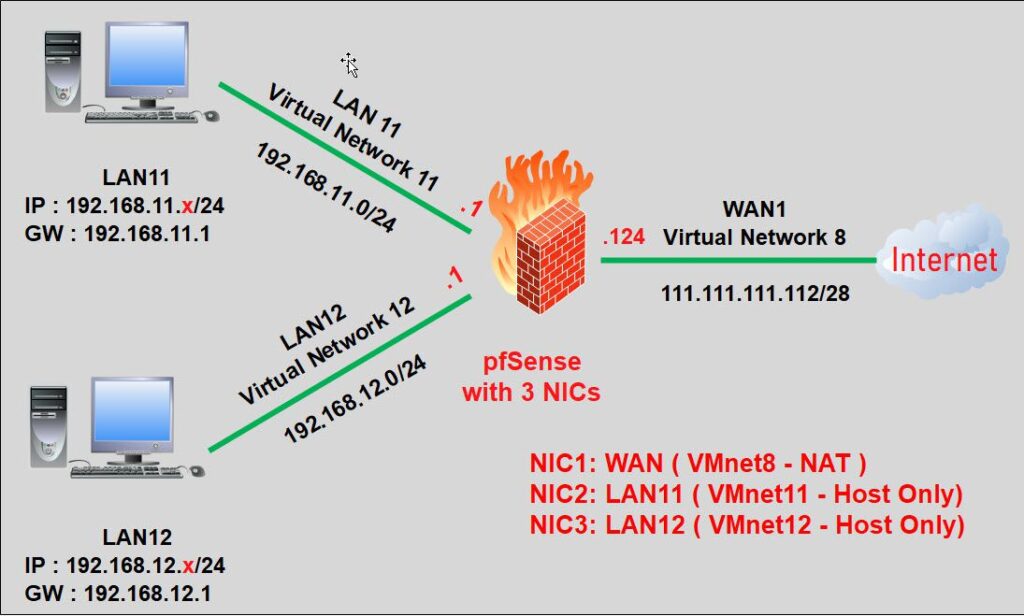
pfSense Firewall has 3 network interfaces (NIC):
- NIC1 is assumed to be WAN (Network: 111.111.111.120/28) connect to the Internet using VMnet8
- NIC2 is assumed to be LAN11 (Network: 192.168.11.0/24) using VMnet11
- NIC3 is assumed to be LAN12 (Network: 192.168.12.0/24) using VMnet12
Step 1 – Configure Virtual Network
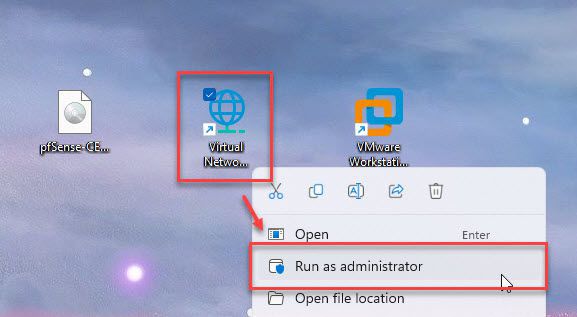
The first step is to configure the Virtual Network by right-clicking on the Virtual Network Editor icon and select Run as administrator
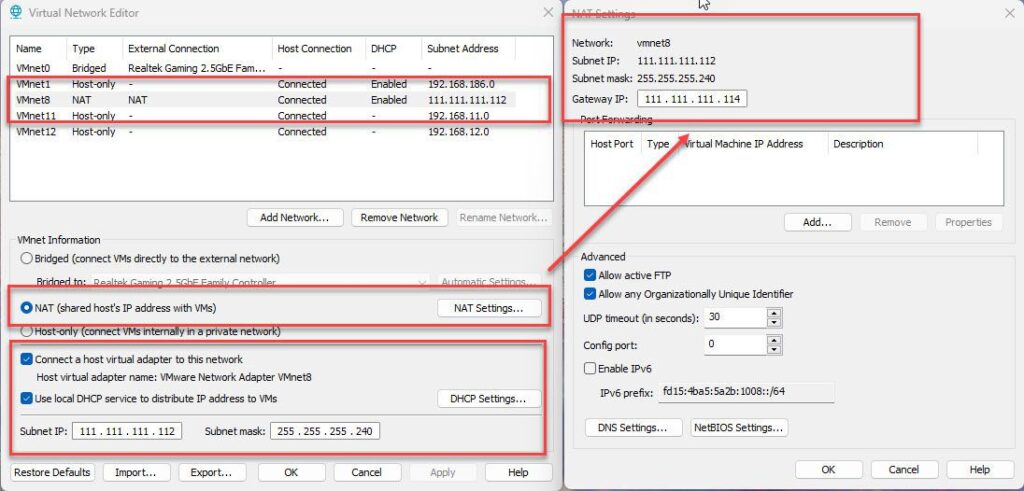
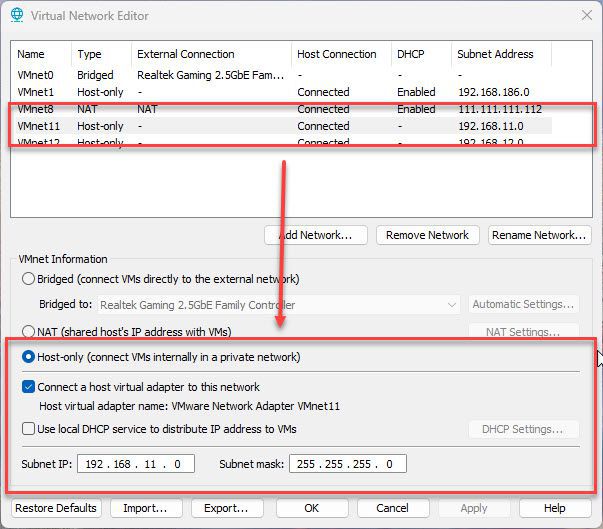
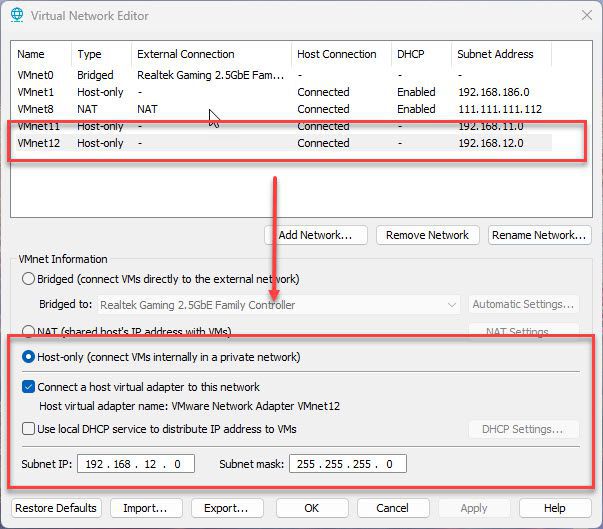
On the Virtual Network Editor window, add 3 NICs: VMnet8, VMnet11, and VMnet12 as shown in the image below.

Configure VMnet8
To configure NIC1 on pfSense as the WAN network using VMnet8 in VMware, we will set up VMnet8 as follows.
- Mode: NAT
- Check to Connect a host virtual adapter to the network option
- Check the Use local DHCP service to distribute IP address to VMs option to enable the DHCP server on VMnet8
- Subnet IP: 111.111.111.112
- Subnet mask: 255.255.255.240
and then click Apply button.
Configure VMnet11
Next, to configure NIC2 on pfSense as the LAN11 network using VMnet11 in VMware, we will set up VMnet11 as follows:
- Mode: Host-only
- Check to Connect a host virtual adapter to the network option
- Subnet IP: 192.168.11.0
- Subnet mask: 255.255.255.0
and then click Apply button.
Configure VMnet12
And finally, to configure NIC3 on pfSense as the LAN12 network using VMnet12 in VMware, we will set up VMnet12 as follows:
- Mode: Host-only
- Check to Connect a host virtual adapter to the network option
- Subnet IP: 192.168.12.0
- Subnet mask: 255.255.255.0
and then click Apply – click OK to close Virtual Network Editor window.
Step 2 – Configure the IP address on the host
After configuring the virtual networks, the next step is to configure the IP address on the host to establish a connection from the host to pfSense.
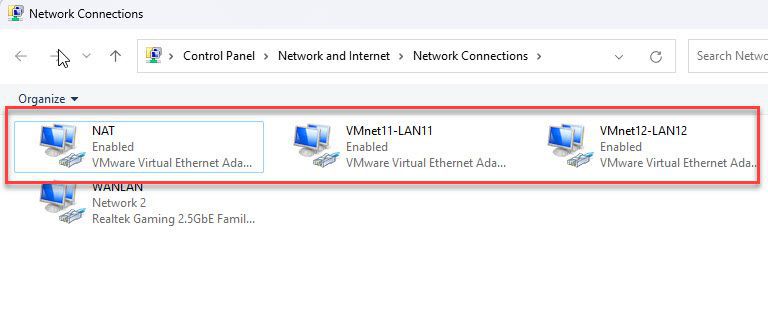
Open Control Panel – click on Network and Sharing Center option – click on the Change adapter settings button, and you will see that VMnet8, VMnet11, and VMnet12 are activated as shown in the image below
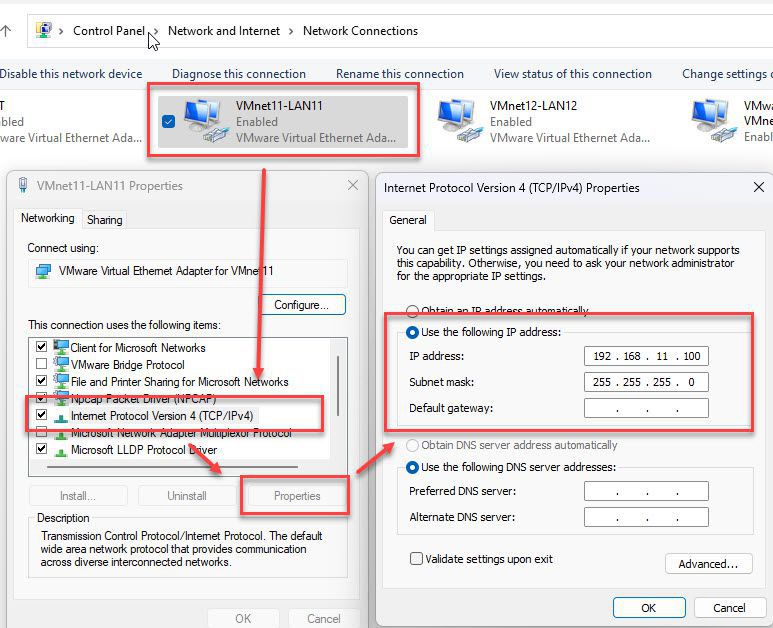
Configure a static IP address on VMnet11 (LAN11)
Set a static IP address for VMnet11 by right-click on VMnet11 – select Properties – select Intenet Protocol Version 4 (TCP/IPv4) – click Properties button and set IP address as shown below:
Note: The static IP address of VMnet11 on the host must be in the same network class as LAN11. In this example, the IP address on the host is 192.168.11.100/24.
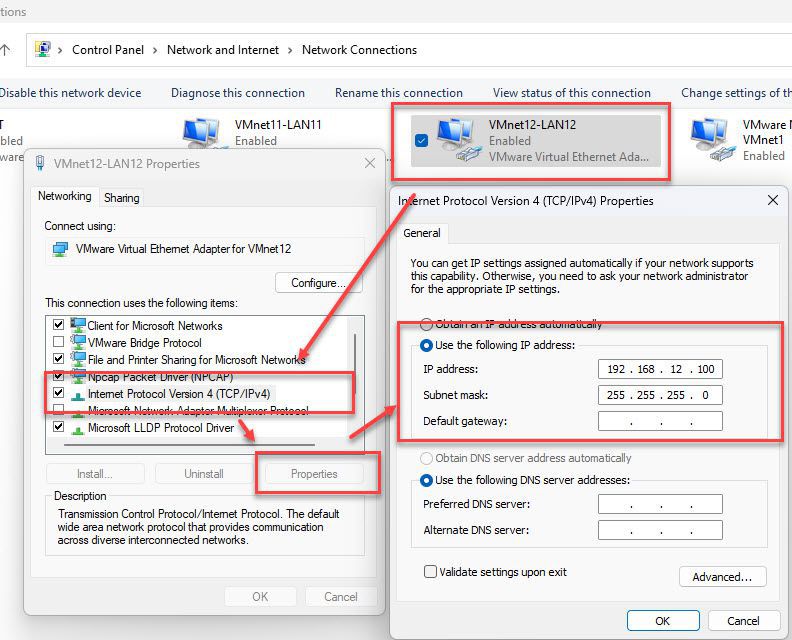
Configure a static IP address on VMnet12 (LAN12)
Similarly, set a static IP address for VMnet12 as shown below:
Note: The static IP address of VMnet12 on the host must be in the same network class as LAN12. In this example, the IP address on the host is 192.168.12.100/24.
Configure IP address on VMnet8 (WAN)
In step 1, we have set up VMnet8 (NAT mode) with the DHCP server function enabled. Therefore, both the host and VM will receive dynamic IP addresses from the DHCP server.
Step 3 – Create a new Virtual machine for pfSense
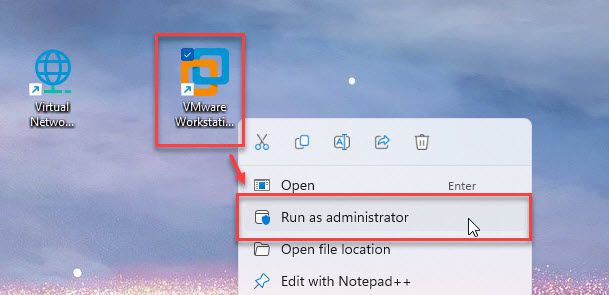
On the desktop, right-click on VMware icon – select Run as administrator
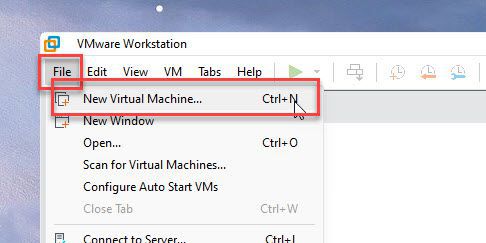
From the menu – select File – select New Virtual Machine…option
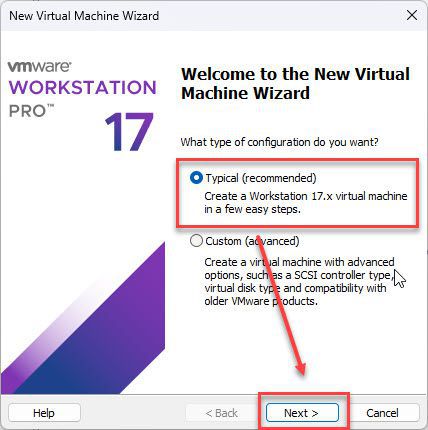
In the Welcome to the New Virtual Machine Wizard window, select Typical – and click Next
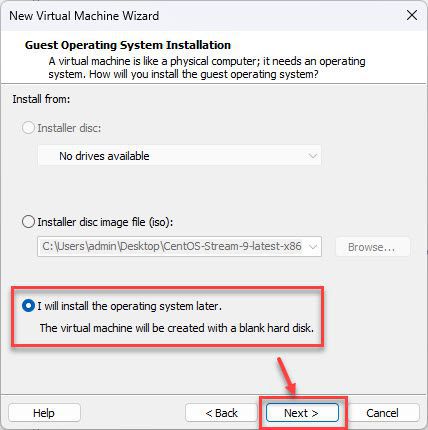
Choose I will install the operating system later option and click Next in the Guest Operating System Installation window.
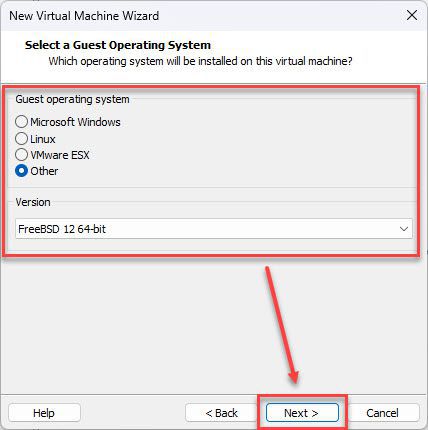
In the Select a Guest Operating System window, choose as shows below:
- Guest operating system: Other
- Version: FreeBSD 12 64-bit
and then click Next
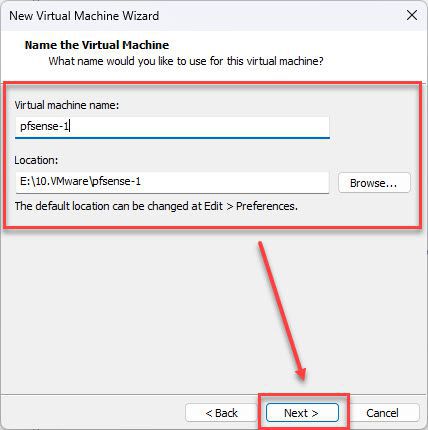
Set a Name and Location for your virtual machine and click Next
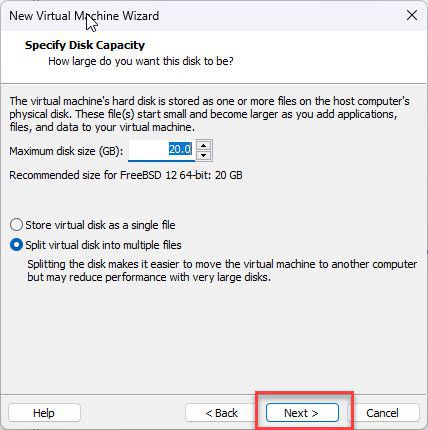
Set the disk capacity to be greater than or equal to 20GB and click Next in the Specify Disk Capacity window.
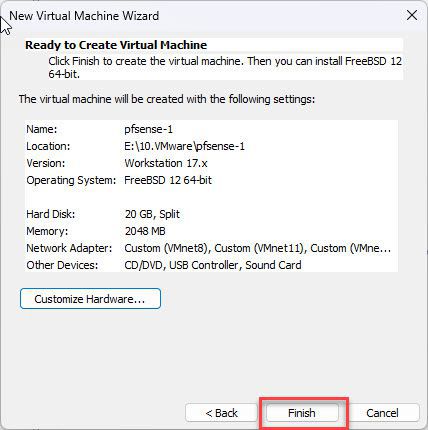
In the Ready to Create Virtual Machine window, click on Customize Hardware…button
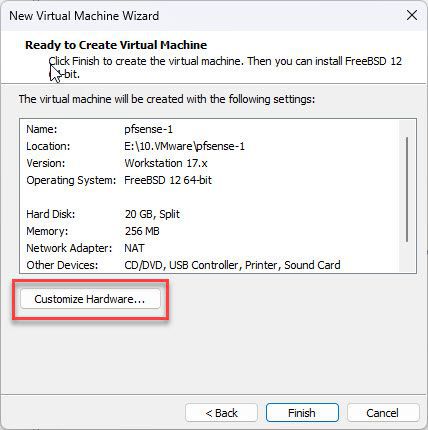
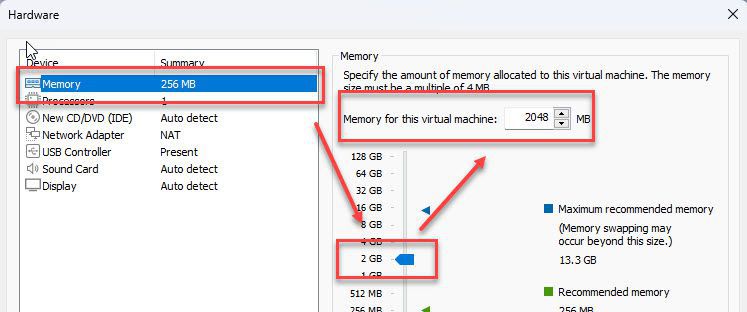
In the Hardware window, configure the settings as shown below.
- Memory (RAM): greater than or equal to 2 GB
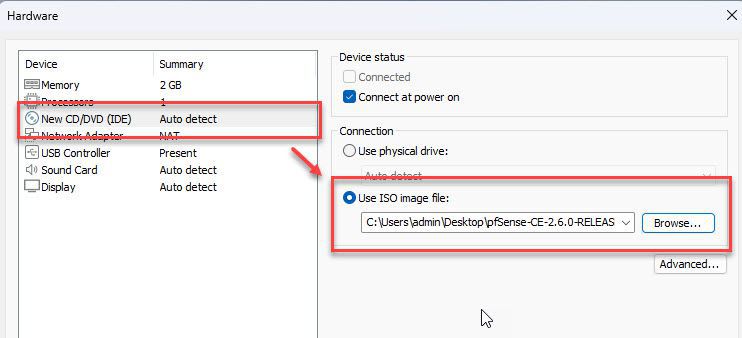
- New CD/DVD (IDE):
- In the Device status section check to Connect at power on option.
- In the Connection section check to Use ISO image file and select pfSense iso image that you downloaded in Step 1
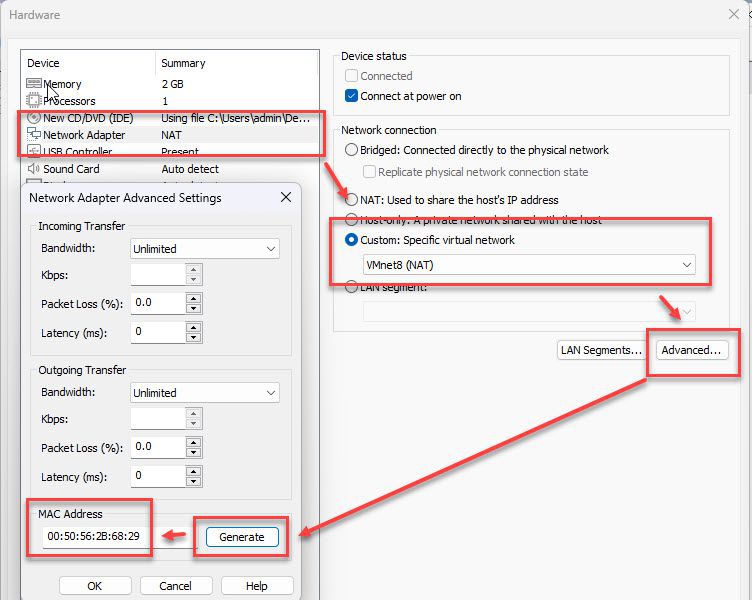
- Network Adapter 1 ( default: Network Adapter)
The first Network Adapter (NIC1) is assumed to be the WAN network – select VMnet8 (which is configured as NAT in step 1) – click Advanced – click the Generate button to create a MAC address for NIC1 (this will help us accurately identify the configuration of each NIC)
The MAC address of Network Adapter 1 (NIC1) is 00:50:56:28:68:29
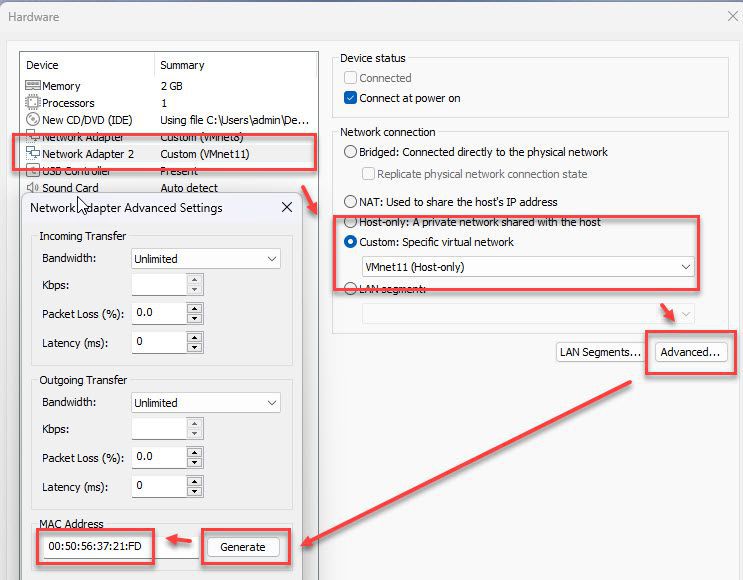
- Network Adapter 2
Next, add the second Network Adapter (NIC2) is assumed to be the LAN11 network- select VMnet11 – click Advance – click Generate button.
The MAC address of Network Adapter 2 (NIC2) is 00:50:56:37:21:FD
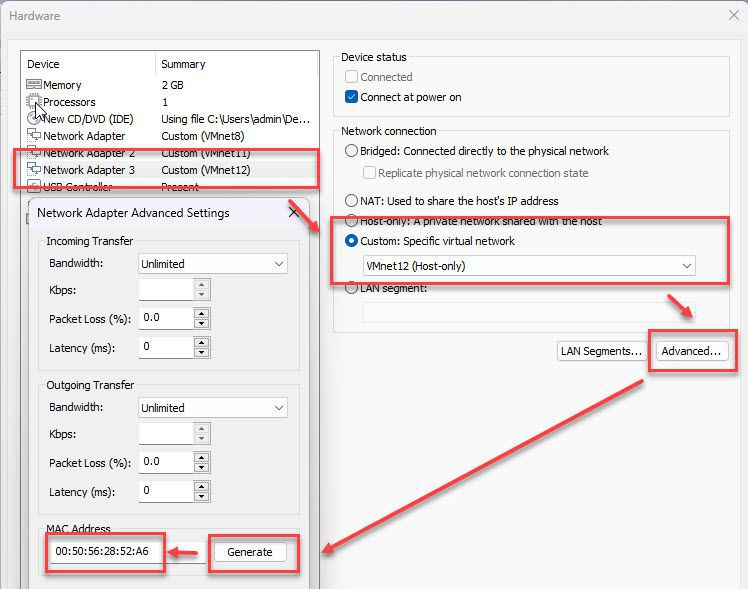
- Network Adapter 3
Finally, add the second Network Adapter (NIC3) is assumed to be the LAN12 network- select VMnet12 – click Advance – click Generate button.
The MAC address of Network Adapter 3 (NIC3) is 00:50:56:28:52:A6
After done, click Close button and comeback Ready to Create Virtual Machine window, click Finish button.
How to Install and Configure pfSense on VMware Workstation continue reading on page 2