Hello everyone. In this post, we will explore How to Install and Configure the Multi PHP version on the Ubuntu or Debian system
In the dynamic world of web development, the ability to work with multiple PHP versions is a valuable asset, especially when different projects may require different PHP releases. Ubuntu/Debian users can harness this flexibility by installing and managing multiple PHP versions seamlessly.
In this guide, we’ll walk you through the process of setting up multiple PHP versions on your Ubuntu/Debian system using the ondrej/php PPA (Personal Package Archive). Whether you’re a developer looking to test compatibility or a system administrator managing diverse applications, this step-by-step tutorial will empower you to effortlessly install and switch between PHP versions, ensuring your projects run smoothly. Let’s dive in!
Prerequisites
- Operating system: Applies to Ubuntu or Debian or Debian-based
- User privileges: root or non-root user with sudo privileges
Read more
- Prometheus – Install and Configure Prometheus Server on Ubuntu/Debian
- How to Install and Configure Grafana Server on Ubuntu / Debian
- How to Install and Configure Snipe-IT Tool on Ubuntu / Debian
- How to Install and Configure GLPI 10 on Debian
- How to Install and Configure NTP Server on Ubuntu
Step-by-step Install and Configure Multi PHP version
Step 1 – Update system
First, update the package repository for your system with the following command:
sudo apt update
Step 2 – Add the ondrej/php PPA
Execute the command below to add the ondrej/php PPA repository and the system’s package repository:
sudo add-apt-repository ppa:ondrej/php
And the re-update repository:
sudo apt update
Step 3- Install PHP
To install the desired PHP version, execute the following command with the following syntax:
sudo apt install php[version_number]
Replace [version_number] with the specific PHP version you want to install.
Example:
To install PHP version 7.4, we will execute the following command:
sudo apt install php7.4 -y
Or install PHP version 8.0, we will execute the following command:
sudo apt install php8.0 -y
Step 4 – Install PHP modules for each version
To install modules for PHP, we execute the command with the following syntax:
sudo apt install php[version_number]–[module_name]
Replace [version_number] with the specific PHP version and [module_name] with the name of modules.
Example:
To install modules for php7.4, we execute the command as follows:
sudo apt install -y php7.4-cli php7.4-fpm php7.4-json php7.4-common php7.4-mysql php7.4-zip php7.4-gd php7.4-mbstring php7.4-curl php7.4-xml php7.4-bcmath php7.4-json
Similarly, use the above syntax to install the necessary modules for other PHP versions that you want.
Step 4 – Switch between PHP versions
By using the above method, you can install different PHP versions as needed. By default, the last installed PHP version becomes the default version on your system.
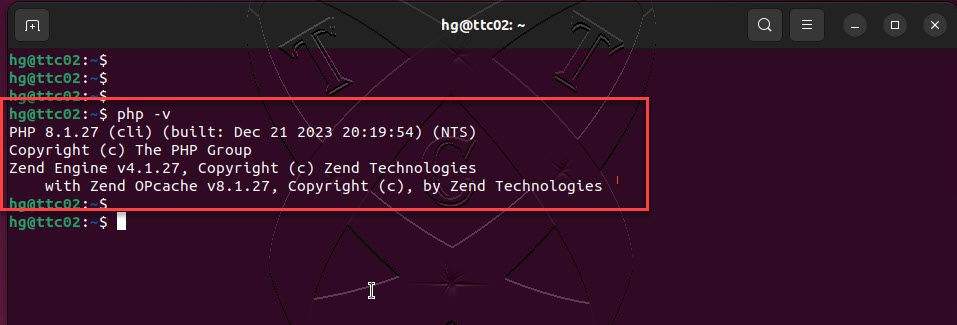
To check the default PHP version, you can use the following command:
php -v
From my results, the default PHP version is 8.1:
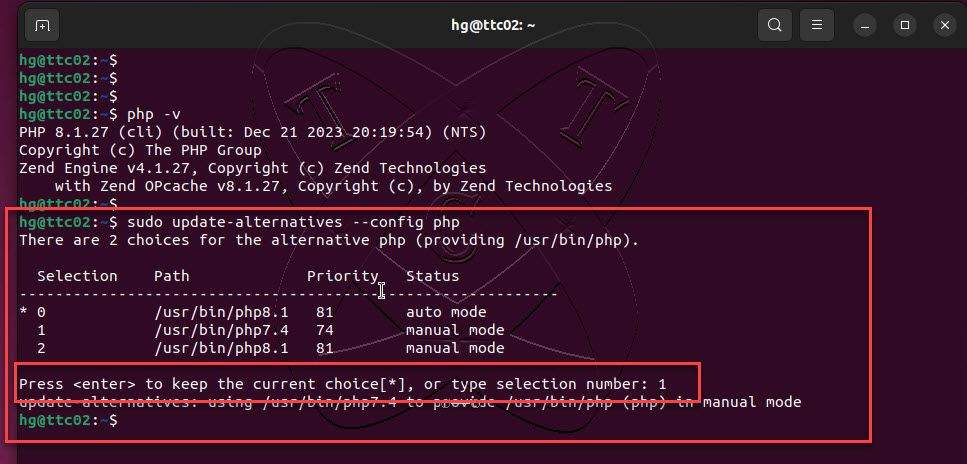
To configure the default PHP version for your system, use the following command syntax:
sudo update-alternatives
--set php
The system will prompt you to choose which PHP version you want to set as the default. Enter the number corresponding to your desired version and press Enter.
Conclusions
In this guide, we’ve explored How to install multiple PHP versions on an Ubuntu/Debian system straightforwardly and flexibly. By utilizing the ondrej/php PPA, we can easily manage and switch between PHP versions, addressing the diverse needs of development projects.
The ability to test and deploy across various PHP versions not only ensures application compatibility but also brings flexibility to the development and maintenance processes.
Hopefully, through this guide, you’ve gained the knowledge and skills to effectively manage multiple PHP versions on your Ubuntu system.
Wishing you success in applying this newfound knowledge to your projects!